Quantcast
Channel: Cloud Training Program
Viewing all 1887 articles
Browse latest View live

OIM/OIG – IDCS Connector Integration : [Troubleshooting] InvalidCredentialException: HTTP 401 Error : User not authorized to execute service

$
0
0

This Post Covers error during IDCS Group Lookup Reconciliation Scheduled Jobs, as a part of Oracle Identity Manager (OIM)/Oracle Identity Governance (OIG), Integration with Oracle Identity Cloud Service (IDCS).

Note: Oracle Identity Manager (OIM) has been changed and rebranded as Oracle Identity Governance (OIG). 

Error: IAM-1020021 Unable to execute job : IDCS Group Lookup Reconciliation org.identityconnectors.framework.common.exceptions.InvalidCredentialException: HTTP 401 Error : User not authorized to execute service.

Before moving into the Issue & its fix, Lets first understand the Overview of Oracle Identity Cloud Service,  IDCS Connector Bundle, Connector server and Scheduled Job.

What is Oracle Identity Cloud Service (IDCS)

Oracle Identity Cloud Service (IDCS) is that provides identity management, single-sign-on (SSO) and identity governance for on-premise or Cloud Applications.

Any user can access the application anytime, anywhere on a device securely. Oracle IDCS integrates directly with existing directories and identity management system, making it easier for users to access applications. Providing a platform that is robust and secure, allows users to access, develop and deploy their applications.

For more details on Oracle Identity Cloud Serve ice (IDCS) Overview & Concepts Click here

What is OIM IDCS Connector Bundle

An Oracle Identity Manager (OIM) connector Bundle is a piece of code that runs on OIM/OIG and Connector Server and used to automatically and continuously provision and reconcile users and groups from OIM/OIG  to target system Oracle Identity Cloud Service (IDCS).

What is Connector Server

An Identity connector server is required when an identity connector bundle is not directly executed within your OIM/OIG application. By using one or more identity connector servers, the Identity Connector Framework (ICF) architecture permits your application to communicate with externally deployed identity connector bundles. 

There are two Identity connector servers are available

  • Java  Connector Server
  • Microsoft .NET Connector Server

For More details on Connector Server for OIM connectors: .NET or JAVA Click here 

Scheduled Job for IDCS Connector

Scheduled jobs for lookup field synchronization fetch the most recent values from specific fields in the target system (IDCS) to lookup definitions in OIM/OIG.

The following scheduled jobs are used for lookup fields synchronization:

  • IDCS Groups Lookup Reconciliation
  • IDCS Managers Lookup Reconciliation

Issue: 

Oracle Identity Manager (OIM) was integrated with Identity Cloud Service (IDCS) using the OIM IDCS connector.

Running schedule job IDCS Group Lookup Reconciliation fails with:

————————————————–

[2019-05-08T05:27:09.923-04:00] [oim_server1] [TRACE] [] [oracle.iam.scheduler.vo] [tid: OIMQuartzScheduler_Worker-8] [userId: oiminternal] [ecid: 0000MdsWf3nFW7WFLzyGOA1Smi79000003,1:26731] [APP: oim#11.1.2.0.0] [SRC_CLASS: oracle.iam.scheduler.vo.TaskSupport$1] [SRC_METHOD: processWithoutResult] Exception encountered
[2019-05-08T05:27:09.923-04:00] [oim_server1] [WARNING] [] [oracle.iam.scheduler.vo] [tid: OIMQuartzScheduler_Worker-8] [userId: oiminternal] [ecid: 0000MdsWf3nFW7WFLzyGOA1Smi79000003,1:26731] [APP: oim#11.1.2.0.0] IAM-1020021 Unable to execute job : IDCS Group Lookup Reconciliation with Job History Id:8061[[
org.identityconnectors.framework.common.exceptions.InvalidCredentialException: HTTP 401 Error : User not authorized to execute service.<HTML><HEAD><META HTTP-EQUIV=”Content-Type” CONTENT=”text/html;charset=UTF-8″><TITLE>Unauthorized</TITLE></HEAD>
<BODY><H1>Unauthorized</H1>
Proper authorization is required for this area. Either your browser does not perform authorization, or your authorization has failed.
</BODY></HTML>
at org.identityconnectors.framework.impl.serializer.CommonObjectHandlers$9.createException(CommonObjectHandlers.java:227)
at org.identityconnectors.framework.impl.serializer.CommonObjectHandlers$9.createException(CommonObjectHandlers.java:224)
at org.identityconnectors.framework.impl.serializer.CommonObjectHandlers$ThrowableHandler.deserialize(CommonObjectHandlers.java:115)
at org.identityconnectors.framework.impl.serializer.binary.BinaryObjectDecoder$InternalDecoder.readObject(BinaryObjectDecoder.java:162)
at org.identityconnectors.framework.impl.serializer.binary.BinaryObjectDecoder.readObject(BinaryObjectDecoder.java:313)

Root Cause:

The issue is generic and can have multiple reasons like:

  1. SSL Handshake fatal Error with IDCS
  2. Several misconfigurations in the IDCS IT resources in OIM
  3. Wrong values in the Client application in IDCS 

Missconfiguration found at Client case while Configuring  IT Resource Parameter

  1. In Client case, IT Resource Parameter of IDCS Connector  authenticationServerUrl was  “https://<IDCS Hostname>/oauth2/token” Instead of “https://<IDCS Hostname>/oauth2/v1/token”/v1 was missing in the Oracle documentaion.
  2. customAuthHeaders  in the IT resource in the field We provided this value with the format: Authorization=Basic XXXXXXXXXXXXXXXXXX instead “Authorization=Basic XXXXXXXXXXXXXXXXXX” (double quotes “” was missing between value)


Troubleshooting:

  1. Check 1: “authenticationServerUrl” should be”https://<IDCS Hostname>/oauth2/v1/token”
  2. Check 2: The value of field customAuthHeaders needs to be enclosed between double quotes. For Example: “Authorization=Basic MTIzZGYxNjBiNjU0NGQyZWE2ZGQ4Y”
  3. Check 3: Port number at which the target system (IDCS) is listening.
  4. Check 4: IDCS always expects SSL communication, so sslEnabled must be set on “true” in the IDCS IT Resource.
  5. Check 5: IDCS’s SSL certificate needs to be loaded in OIM’s truststore. How to import IDCS SSL Certificate in OIM TrustStore Click here to check.

IDCS IT resources in OIM Screen:  To Configure IDCS IT Resource parameters in OIM you use the below configuration details. For more details on Configuring the Identity Cloud Service Connector Click here.

Client application in IDCS: Make sure you use the below configuration details when you Create an Application in IDCS. For more details on Register to OIM Application in IDCS Click here

Testing:

We could successfully run the Scheduled jobs in OIM/OIG.

This post is from our Oracle Identity Cloud Service (IDCS) training in which we have covered everything one should know about Oracle Identity Cloud Service like Architecture, Users & Groups Application, Branding, Auditing & Reports, Rest APIs, Adaptive security and much more.

Interested? Register for Free Master Class on Cloud Security Using Oracle IDCSCareer Path & What to Learn? 

Related Posts

  • Cloud Security With Oracle Identity Cloud Service (IDCS) Click here
  • Oracle Identity Cloud Service (IDCS): Step By Step Lab Activity Guide for Beginners Click here
  • Oracle Identity Cloud Service (IDCS) Overview & Concepts Click here
  • Cloud Security Using Identity Cloud Service Click here
  • Oracle Identity Cloud Service: Configuring Multi-Factor Authentication (MFA) Click here
  • High-level Steps to Protecting an On-premises Application with IDCS by Using WebGate Click Here

References

Register for Free Master Class on Cloud Security Using Oracle IDCSCareer Path & What to Learn? 

Next Task for You

Download our FREE Guide i.e., 7 Docs Must Read to Become Expert in Cloud Security With Oracle Identity Cloud Service (IDCS).

Click on the image below to Download the Guide:


The post OIM/OIG – IDCS Connector Integration : [Troubleshooting] InvalidCredentialException: HTTP 401 Error : User not authorized to execute service appeared first on Oracle Trainings.


Required Packages For Oracle E-Business Suite (EBS) R12 On Oracle Linux 7/ Red Hat Enterprise Linux 7

$
0
0

This post covers what all packages are required (RPM’s) for Oracle E-Business Suite (EBS) R12 On Oracle Linux 7 or Red Hat Enterprise Linux 7.

If you are new to Oracle E-Business Suite, then I would suggest you check our previous post where we have covered in detail about  Oracle E-Business Suite R12.2 Architecture. and also check what all operating system is supported by Oracle E-Business Suite (EBS)R12.

Required Packages

Below are the required packages needs to be installed on your Oracle Linux 7 or Red Hat Enterprise Linux 7  before installing Oracle E-Business Suite (EBS)R12 on it.

Note: Customers on Exadata (Database Machine, Cloud Machine, Cloud Service) should not install the packages listed below as the system already contains all required packages and settings needed to run the Oracle Database.

Packages Need to be Installed In  Application Tier

  • compat-libstdc++-296-2.96-144.0.2.el7.i686
  • openmotif21-2.1.30-11.EL7.i6861
  • xorg-x11-libs-compat-6.8.2-1.EL.33.0.1.i386
  • libXrender-0.9.8-2.1.el7.i686
  • perl-File-CheckTree-4.42-3.el7.noarch

Packages Need to be Installed In  Database Tier

  • compat-libcap1-1.10-7.el7.x86_64
  • compat-libstdc++-33-3.2.3-71.el7.x86_64
  • elfutils-libelf-devel-0.158-3.el7.x86_64
  • libaio-devel-0.3.109-12.el7.i686
  • libaio-devel-0.3.109-12.el7.x86_64
  • xorg-x11-utils-7.5-13.1.el7.x86_64

Packages Need to be Installed In  Database Tier & Application Tier

  • binutils-2.23.52.0.1-16.el7.x86_642
  • compat-libstdc++-33-3.2.3-71.el7.i686
  • gcc-4.8.2-16.el7.x86_64
  • gcc-c++-4.8.2-16.el7.x86_64
  • gdbm-1.10-8.el7.i686
  • gdbm-1.10-8.el7.x86_64
  • glibc-2.17-55.el7.i686
  • glibc-2.17-55.el7.x86_64
  • glibc-common-2.17-55.el7.x86_64
  • glibc-devel-2.17-55.el7.i686
  • glibc-devel-2.17-55.el7.x86_64
  • libgcc-4.8.2-16.el7.i686
  • libgcc-4.8.2-16.el7.x86_64
  • libstdc++-devel-4.8.2-16.el7.i686
  • libstdc++-devel-4.8.2-16.el7.x86_64
  • libstdc++-4.8.2-16.el7.i686
  • libstdc++-4.8.2-16.el7.x86_64
  • libXi-1.7.2-2.1.el7.i686
  • libXp-1.0.2-2.1.el7.i686
  • libXp-1.0.2-2.1.el7.x86_64
  • libXtst-1.2.2-2.1.el7.i686
  • libaio-0.3.109-12.el7.i686
  • libaio-0.3.109-12.el7.x86_64
  • libgomp-4.8.2-16.el7.x86_64
  • make-3.82-21.el7.x86_64
  • redhat-lsb-4.1-24.0.1.el7.x86_64
  • sysstat-10.1.5-4.el7.x86_64
  • util-linux-2.23.2-16.el7.x86_64

If your Application tier & Database tier is on same machine, then these pacakages needs to be installed in same machine only.

You can also directly install all the required packages for Oracle E-Business Suite (EBS) R12 on Oracle Linux 7 or Red Hat Enterprise Linux 7 by using below command, make sure yum is configured on your machine.

yum install oracle-ebs-server-R12-preinstall

Oracle E-Buisness Suite R12 RPMs

Oracle E-Buisness Suite R12 RPMs

Alternatively, on the Database tier & Application tier, you can install the following pre-install rpm available via ULN for both Oracle Linux 7 or Red Hat Enterprise Linux 7

If you like the blog don’t forget to share with your friends, colleagues who are working on Oracle E-Business Suite R12 & post your comments if you have any doubts regarding packages required for installing Oracle E-Business Suite (EBS) R12 on  Oracle Linux 7 or Red Hat Enterprise Linux 7.

Related/Further Readings

Next task for you

Appsdba Free guide Every Apps DBA Must Read

AppsDBa R12.2 Must Read Guide

Want to Know More about R12.2? Click on the image below, and get your FREE Guide i.e., “6 Docs Every Oracle Apps DBA Must Read for R12.2”. 

The post Required Packages For Oracle E-Business Suite (EBS) R12 On Oracle Linux 7/ Red Hat Enterprise Linux 7 appeared first on Oracle Trainings.

Introduction: Integration Cloud Service (ICS)

$
0
0

Integration Cloud Service (ICS) and SOA Cloud Service are two cloud integration products that have been launched by Oracle in recent times.

The first question that arises is why two products?

  • The primary difference between the two is the range of functions that can be done. While SOA cloud Service is basically SOA Suite in the cloud and intended for hardcore developers who are used to working with SOA Suite and want to continue leveraging its multiple capabilities like MDS and the ability to achieve very complex integrations.
  • ICS is more of a lightweight service that can be used to achieve simple, lightweight integrations that do not require much complexity. Oracle intends ICS to be used by technically inclined clients without the need for a hardcore developer to come in and save the day!

In our opinion, the main differentiating factor of ICS from other integration cloud products is the rich variety of connectors that they offer (currently 50) that includes connections to other cloud products like RightNow, Eloqua, SalesCloud and various social media like Facebook, Twitter, LinkedIn and a lot more.

Without further ado, let’s get started with how to request a trial of ICS from Oracle:

Request A Trial of ICS:

  • Go to cloud.oracle.com and Click on ‘Try for free’ on the top right corner, and scroll down to ‘Integration Cloud’, click ‘Try for free’.oracle integration cloud application
  • After you have signed up, you will be directed to the below page, where you would be asked to fill up your personal details like Name, Company, Phone Number, etc. (you know the drill). Two fields to note are ‘Service Name’ and ‘Identity Domain’, you should put in some thought as to what do you want to fill in here, because these would appear in any endpoints that you would expose to be used by clients calling your ICS services. For example, I named ‘Service Name’ as ‘integration’ and ‘Identity Domain’ as ‘<companyname>’.

verification details

  • After you click submit, you should get an email within a couple of days from Oracle asking you to ‘Activate Your Trial’. After you click on that, you should get an email soon with your login details, and you all set to go!!

An Introduction to the UI (User Interface) of ICS:

Once you login to ICS, you would see this screen:

user interface of ICS

There are a number of cards on the homepage, a short introduction to each of these cards:

  1. Connections: Connections are the various connectors which can be utilized to communicate with external applications. Communication can be done with conventional systems like File, FTP, etc., and also with new social media and other applications, like LinkedIn, Facebook, Twitter, Evernote, etc.
  2. Integrations: Integrations are processes which utilize connections (among other things) to implement a business process.
  3. Dashboard: Provides an overview with multiple cards and reports detailing things like the success rate of requests, number of total integrations which are currently active, etc. Also lets you download diagnostic logs for individual requests.
  4. Lookups: A bit like DVMs in SOA Suite, can cross-reference values of the same attribute/element when mapping from one system to another.
  5. Packages: A bit like partitions in EM console, can be used to group together similar integrations.
  6. Agents: Agents are used to connecting to on-premise applications. For example, if you are using on-premise systems like ERP/SAP and also using Oracle ICS in the same implementation, you would have to use an agent to connect to the ICS application.
  7. Adapters: Adapters lists all the adapters that are available for external communication. Currently, about 50 adapters are offered.

Other than this, there are also four home tabs on the top right side:

  1. Home: An overview page where you can see all the options mentioned above.
  2. Designer: Here, new instances of the above-mentioned artifacts (connections, integrations, etc.) can be created and viewed.
  3. Monitoring: Same as the dashboard (mentioned above)
  4. Administrations: Used for things like changing log levels, any notifications, and managing certificates which have been installed in your ICS instance. For example, the twitter certificate has to be installed before a connection can be made with the Twitter API using the Twitter connection.

This is all in nutshell about Integrated Cloud services. We cover this in introduction module of our Oracle Integration Cloud Services Training where we also cover about configuring Adaptors and connections, Configuring integrations, Data Mapping, Lookups, SaaS, On-premises integration agents, Security, Schedules, Versioning, Activating, Monitoring integrations and much more.

Next Task for you:

Did you get a chance to download 6 Documents Every Oracle Cloud integrator must read? If not, then get it now by clicking on the image below.

If you liked this post then share with Your Friends over Social Media!

The post Introduction: Integration Cloud Service (ICS) appeared first on Oracle Trainings.

Oracle EBS(R12) Cloud Manager Overview : What & How

$
0
0

This post covers the Overview & Concepts of EBS Cloud Manager (EBSCM).

Oracle E-Business Suite Cloud Manager is a key component of the Oracle E-Business Suite automation for Oracle Cloud Infrastructure (OCI).

It is the successor to the EBS Cloud Admin Tool and is first being introduced for Oracle Cloud Infrastructure (OCI). To know more about Cloud Admin Tool check our previous post on Role Of EBS Cloud Admin Tool in Provisioning Oracle EBS (R12) on Cloud

Introduction To EBS Cloud Manager (EBSCM)

EBS Cloud Manager is a tool through which you can manage E-Business Suite on Oracle Cloud Infrastructure (OCI). This tool can be used to Create, Manage, Configure Oracle application on Oracle Cloud (OCI).

EBS Cloud Manager

EBS CLoud Manager is a Tool ( Virtual Machine ) that centrally manages all your EBS Environments on the Oracle Cloud (OCI).

Features of EBS Cloud Manager(EBSCM)

Using EBS Cloud Manager you can do:

  • Environment Deployment
  • One-Click provisioning with pre-populated deployment options (Single Node, Demo)
  • Advanced provisioning with user-selected deployment options
  • Lift and Shift Migration to OCI from on-premises backup
  • Lifecycle management
  • Clone the environment
  • Delete the environment
  • Separation of Duties: Multiple Compartment, groups, and Network Profiles
  • Backup & Recovery
  • TDE for Compute DB instance
  • More use cases in pipeline like Adding additional node, HA & DR

EBS Cloud Manager EnvironmentsFeatures of EBS CM

EBS Cloud Manager Benefits

  • Secure, with a load balancer that works as a TLS termination point.
  • Deployed on a subnet that is not directly exposed to the end user’s network
  • Multiuser, allowing multiple DBAs to manage the same set of Oracle E-Business Suite environments.
  • Fully integrated with Identity Cloud Service (IDCS) for authentication services.

How to Provision EBS Cloud Manager (EBSCM) 

1) Log in to the Oracle Cloud account, go to the OCI Console.
Note: If you haven’t registered for the Oracle Cloud Free Trial account yet, then, please Download Step by Step Activity Guide to Register for Oracle Cloud Trial Account

2) From the navigation menu, click on Marketplace

Navigation to Marketplace

3) In this Marketplace, you will get the EBS CM image as well as all the Oracle provided Images & partners

EBS CM Image

4) Simply click on launch instance & it will create a Linux Machine inside your OCI Console using which you can then create or provision other EBS environment, also manage EBS.

Version Details & launch Instance

How to Check EBS Cloud Manager Version

Access the URL of your Cloud Manager & on the Top Right Side click About

E-Business Suite Cloud Manager Version

How to Provision EBS (R12) Using Cloud Manager (EBSCM)

Cloud Manager gives 2 options for Provisioning:

  • Simplified Provisioning of EBS: Where preset topologies are defined and we can select and perform quick provisioning.
  • Advance Provisioning of EBS: Here we can define our own topology to provision EBS and is useful in case of complex architectural design. Here we get the option to create the Instance using a backup of the database as well and we can define the backup policies too.

1) On the Oracle E-Business Suite Cloud Manager Environments page, click Provision Environment and select One-Click.

One click provisioning

2) Enter the values for your new environment and click Submit

EBS One Click Provisioning

You can see Architecture details of the already created instance Application, Database and Load Balancer what all is included in the Architecture in our previous blog on Oracle E-Business Suite (R12) On OCI for Apps DBAs

Environment Overview of EBS on OCI Cloud Manager

How to Migrate EBS From On-premise to Cloud (Lift and Shift ) Using Cloud Manager

We can move the on-premises instance to Cloud using Cloud manager. Cloud manager is capable of creating an instance from the object storage backup. It uses new backup utility which is known as EBS Cloud Backup Utility, as a standalone tool for taking EBS backup to object storage and needs to be run on the source environment.

EBS on OCI Cloud Manager Details

How to Clone EBS (R12) on Cloud 

One of the most common activity for DBA is Cloning and with this tool, it can be done quickly and conveniently. As of not only Compute clone can be done which will be blocked volume cloning or fast cloning methodology

If you want to know more about Cloning check my previous blog on E-Business Suite (EBS) on OCI | Block Volume Cloning | Automated Way

Clone Details of EBS on OCI Cloud Manager

How to Delete an Environment

An environment created may need to be decommissioned when not needed. The easy way to decommission the environment and release the resource involved and this will further reduce your cloud cost. All this can be done easily using Cloud Manager.

Finally much improved and GUI based tool for managing Oracle EBS environment on the cloud with new EBS backup utility is released and much more addition to coming with time.

Please stay tuned for our future blog on Cloud Manager where we will deep-diving into Cloud Manager & will see various aspects of it.

Related/References

Next Task For You

If you are an Oracle Apps DBA and just starting out your journey to Oracle public Cloud then we highly recommend you to download our FREE Guide that contains 7 Things Every Oracle Apps DBA & Architect Must Know To Build & Manage EBS (R12) On Cloud in order to Manage & Migrate Oracle EBS R12 on Oracle Cloud.

Click on below image to get the FREE Guide.

EBS on Oracle Cloud Free Guide

The post Oracle EBS(R12) Cloud Manager Overview : What & How appeared first on Oracle Trainings.

Oracle Integration Cloud Service(ICS): Using ICS to connect to Social Media [Part 1]

$
0
0

In today’s world, influencing people through social media is not a luxury, but a necessary part of every company’s growth strategy. In this blog series, we will use ICS to connect to social media like LinkedIn and post messages.

Use case:

A company has the requirement to advertise an available position automatically on LinkedIn. This can happen when a new position is created, or when someone leaves the company, resulting in that position being vacant. For the purpose of this POC (Proof of concept), we are going to mimic the company’s resource management system with SOAPUI (open-source web service testing application for service-oriented architectures (SOA) and representational state transfers (REST)). SOAPUI/Resource Management system sends a REST request to ICS as and when a position is available with the following two fields:

  • Destination: The destination platform where the opportunity will be posted, in this case, LinkedIn.
  • Message: The actual message that has to be posted on LinkedIn/Twitter.

Implementation and Testing:

The implementation will be done in three parts:

1) Part 1: We create a connector from ICS to LinkedIn.

2) Part 2: Create the orchestration, request and response mappings

3) Part 3: Create a mock client using SOAPUI, and test the flow

First Part will be covered by this blog, the next steps will be covered by the next blogs in the series.

So let’s we start off with creating a connection to LinkedIn. First, you have to configure your LinkedIn account so it can accept connections from ICS. Since the process is well-documented at https://docs.oracle.com/cloud/latest/intcs_gs/ICSLI/GUID-7A6854EE-4ED9-4978-8DB7-EF0A7C2C5CDD.htm#ICSLI-GUID-6CD39FBD-7E66-4DB2-997D-EEE3EB3CFBBE, We would not repeat it in this blog. After that,you have perform below steps:

1)  Access Oracle Integration cloud service Console.

For those who are new to ICS, Please check our previous blog post here to create a new ICS account and how to access it.

2)  Click on ‘Connections‘ on the home page, and then ‘New Connector‘. This opens up a window with all the available type of connectors. Search at the top or scroll down for ‘LinkedIn‘ connector.

Different Type of Connector

3)  Click on the connector, a new window opens up for entering information, name your connection to LinkedIn.

Information about New Connection

4)  After this, click on ‘Configure Security’ at the right bottom side. You would see a screen like this, provide your Client Id and Client Secret (which you got after creating your app on LinkedIn’s app console, as mentioned in the Oracle documentation to which I pointed above). The scope basically means what this connection is allowed to do on your LinkedIn account. In this case, it says it is the admin account for the company and is allowed to share things. Now, click ‘Provide Consent’.

administration account credits

5)  Now, you would probably see the below screen with an error. This is because a ‘Redirect URL’ has to be provided in your app at the LinkedIn app page. This helps the connection from ICS to LinkedIn authorize and establish the connection. Go to the address bar, and copy the string after redirect_uri. It should look something like this: https%3A%2F%2Fintegration<companyname>nl.integration.us2.oraclecloud.com%3A443%2Ficsapis%2Fagent%2Foauth%2Fcallback.

This has to be decoded, I used https://meyerweb.com/eric/tools/dencoder/, and ended up with https://integration<companyname>nl.integration.us2.oraclecloud.com:443/icsapis/agent/oauth/callback

error message for invalid redirect

6)  Go to the LinkedIn app console, and add this decoded URL in ‘Authorized Redirect URLs’, and click ‘Update’ at the bottom.

Decode Redirect URL

7)  Now, go back to ICS, click ‘Provide Consent’, and voila! You got a connection! Click ‘TEST’ on top right to finish creating the LinkedIn connector.

Access allowed for Integration cloud service

This is all about the first part of this blog series that is creating a connector from ICS to LinkedIn.In the next Part of this blog series, we will cover Creating the orchestration, request and response mappings, Create a mock client using SOAPUI and then will test the flow.

So Stay tuned for our next blog !

This post is from our Oracle Integration Cloud Services Training where we also cover about configuring Adaptors and connections, Configuring integrations, Data Mapping, Lookups, SaaS, On-premises integration agents, Security, Schedules, Versioning, Activating, Monitoring integrations and much more.

Next Task for you:

Did you get a chance to download 6 Documents Every Oracle Cloud integrator must read? If not, then get it now by clicking on the link below.

If you liked this post then share with Your Friends over Social Media!

The post Oracle Integration Cloud Service(ICS): Using ICS to connect to Social Media [Part 1] appeared first on Oracle Trainings.

OIM/OIG – IDCS Integration : [Solved] javax.net.ssl.SSLHandshakeException : PKIX path building failed

$
0
0

This Post Covers javax.net.ssl.SSLHandshakeException PKIX path building failed error while running schedule job IDCS Group Lookup Reconciliation as a part of Oracle Identity Manager (OIM)/Oracle Identity Governance (OIG), Integration with Oracle Identity Cloud Service (IDCS).

Error: javax.net.ssl.SSLHandshakeException: sun.security.validator.ValidatorException: PKIX path building failed: sun.security.provider.certpath.SunCertPathBuilderException: unable to find valid certification path to requested target.

If you are new to Secure Socket Layer (SSL), then I would suggest you check our previous post where we have covered in detail.

  • SSL in WebLogic (CA, KeyStore, Identity & Trust Store) : Things you must know – Part I Click Here
  • SSL in WebLogic Server – Part II : Create KeyStore, generate CSR, Import CERT and configure KeyStore with WebLogic Click Here

If you want to know more about Oracle Identity Cloud Service (IDCS) check our previous post where we have covered in detail about Oracle Identity Cloud Serve ice (IDCS) Overview & Concepts 

Issue: 

Oracle Identity Manager (OIM) was integrated with Identity Cloud Service (IDCS) using the OIM IDCS connector.

While Running schedule job IDCS Group Lookup Reconciliation fails with javax.net.ssl.SSLHandshakeException: PKIX path building failed error:

Log Filename = $DOMAIN_HOME/servers/oim_server1/logs/oim_server1-diagnostic.log.

————————————————–

Caused by: javax.net.ssl.SSLHandshakeException: sun.security.validator.ValidatorException: PKIX path building failed: sun.security.provider.certpath.SunCertPathBuilderException: unable to find valid certification path to requested target
at sun.security.ssl.Alerts.getSSLException(Alerts.java:192)
at sun.security.ssl.SSLSocketImpl.fatal(SSLSocketImpl.java:1884)
at sun.security.ssl.Handshaker.fatalSE(Handshaker.java:276)
at sun.security.ssl.Handshaker.fatalSE(Handshaker.java:270)
at sun.security.ssl.ClientHandshaker.serverCertificate(ClientHandshaker.java:1341)
at sun.security.ssl.ClientHandshaker.processMessage(ClientHandshaker.java:153)
at sun.security.ssl.Handshaker.processLoop(Handshaker.java:868)
at sun.security.ssl.Handshaker.process_record(Handshaker.java:804)
at sun.security.ssl.SSLSocketImpl.readRecord(SSLSocketImpl.java:1016)
at sun.security.ssl.SSLSocketImpl.performInitialHandshake(SSLSocketImpl.java:1312)
at sun.security.ssl.SSLSocketImpl.startHandshake(SSLSocketImpl.java:1339)

at org.apache.http.conn.ssl.SSLConnectionSocketFactory.createLayeredSocket(SSLConnectionSocketFactory.java:290)
at org.apache.http.conn.ssl.SSLConnectionSocketFactory.connectSocket(SSLConnectionSocketFactory.java:259)
at org.apache.http.impl.conn.HttpClientConnectionOperator.connect(HttpClientConnectionOperator.java:125)
at org.apache.http.impl.conn.PoolingHttpClientConnectionManager.connect(PoolingHttpClientConnectionManager.java:319)
at org.apache.http.impl.execchain.MainClientExec.establishRoute(MainClientExec.java:363)
at org.apache.http.impl.execchain.MainClientExec.execute(MainClientExec.java:219)
at org.apache.http.impl.execchain.ProtocolExec.execute(ProtocolExec.java:195)
at org.apache.http.impl.execchain.RetryExec.execute(RetryExec.java:86)
at org.apache.http.impl.execchain.RedirectExec.execute(RedirectExec.java:108)at sun.security.validator.PKIXValidator.doBuild(PKIXValidator.java:385)
at sun.security.validator.PKIXValidator.engineValidate(PKIXValidator.java:230)
at sun.security.validator.Validator.validate(Validator.java:260)
at sun.security.ssl.X509TrustManagerImpl.validate(X509TrustManagerImpl.java:326)
at sun.security.ssl.X509TrustManagerImpl.checkTrusted(X509TrustManagerImpl.java:231)
at sun.security.ssl.X509TrustManagerImpl.checkServerTrusted(X509TrustManagerImpl.java:126)
at sun.security.ssl.ClientHandshaker.serverCertificate(ClientHandshaker.java:1323)
… 155 more

Root Cause:

The OIM/OIG and Oracle Identity Cloud Service (IDCS) integration is performed only using an encrypted protocol (HTTPS). This type of communication requires that the Oracle Identity Cloud Service certificate is available in the OIM server trust store.

Whenever OIM Server attempts to connect to Oracle Identity Cloud Service (Target system),  it will only be able to connect to IDCS if it can trust it. The way trust is handled in the OIM Server is when you have Imported IDCS SSL Certificate in OIM and OIM JDK TrustStore Respectively.

OIM JDK TrustStore location: $JAVA_HOME/lib/security/cacerts

OIM Server TrustStore Location:  $WL_HOME/server/lib/DemoTrust.jks

This contains a list of all known Certificate Authority (CA) certificates, and OIM Server will only trust certificates that are signed by one of those CAs or public certificates that exist within that keystore.

These certificates combined are referred to as the certificate chain, and, as they are all within the OIM Server Truststore (DemoTrust.jks) and  OIM JDK Truststore (cacerts) OIM Server will trust any certificates signed by them (in this case, *.identoty.oraclecloud.com).

This problem is therefore caused by a certificate that is self-signed (a CA did not sign it) or a certificate chain that does not exist within the OIM Server TrustStore. OIM Server did not trust the certificate and fails to connect to the Oracle Identity Cloud Service (IDCS).

Troubleshooting:

You export the Oracle Identity Cloud Service HTTPS public certificate and import the same into the OIM trust store and make sure Enable SSL as “True” in IDCS IT Resource Parameter.

HighLevel Steps to export HTTP public certificate & Import them into OIM TrustStore:

  1. Export the HTTPS public certificate (IDCS Public certificate)
  2. Then, Check where to import OIM Trust Store
  3. After checking location, Import IDCS Public Certificate into OIM Trust Store
  4. Enable SSL as “True” in IDCS IT Resource Parameter
  5. Testing

1. How to Export the IDCS HTTPS public certificate:

In this section, you have to access the IDCS Service Console URL and export the HTTPs Public certificates.

  • Access the Oracle Identity Cloud Service UI in Firefox Browser
  • In the address bar, click the lock icon, click Connection>, and then click More Information.

  • Click View Certificate.

  • Click Details and then click Export

  • Select X.509 Certificate (PEM) as type and save the certificate file. Default name of this certificate is -identityoraclecloudcom , change it with idcs.cer
  • Transfer that certificate in the OIM Server under /tmp
  • Next, you need to import the IDCS certificates into the OIM trust store.

2. How to check Identity and Trust Keystore location into OIM

  • Login to WebLogic console http://<hostname>:7001/console and Go to -> Servers->OIM Managed Server (oim_server1)

  • Click on Configuration->keystores (This page let you view and define Identity & Trust keystore configurations)

3. How to import the IDCS HTTPS public certificate into the OIM trust store: 

After exporting the IDCS HTTPs Public Certificates, you have to import them into the OIM Server and OIM JDK trust store.

  • Launch the OIM server terminal and enter the following command to import the certificate into the OIM JDK trust store. (use root user else you will hit error permission denied at the end )

keytool -import -keystore $JAVA_HOME/jre/lib/security/cacerts -file /tmp/idcs.cer -storepass changeit -alias idcs

Click yesThe keytool utility should display the message Certificate was added to keystore.

  • Now, import the certificate into the OIM Server trust store:

keytool -import -keystore $WL_HOME/server/lib/DemoTrust.jks -file /tmp/idcs.cer -storepass DemoTrustKeyStorePassPhrase -alias idcs

  • When prompted, enter yes.

The keytool utility should display the message Certificate was added to keystore.

4.  How to Enable SSL as “True” in IDCS IT Resource Parameter

IDCS always expects SSL communication, so sslEnabled must be set on “true” in the IDCS IT Resource.

  • login to Identity System Administration Console http://<hostname>:14000/syadmin and Go to IT Resource -> Edit -> IDCS IT resource

  • Edit IT Resource Details and Parameters and add sslEnables as “True

  • View IT Resource Details and Parameters and Confirm details

Testing:

We could successfully run the Scheduled jobs in OIM/OIG.


This post is from our Oracle Identity Cloud Service (IDCS) training in which we have covered everything one should know about Oracle Identity Cloud Service like ArchitectureUsers & Groups Application, Branding, Auditing & Reports, Rest APIs, Adaptive security and much more.

Interested? Register for Free Master Class on Cloud Security Using Oracle IDCSCareer Path & What to Learn? 

Related Posts

  • Cloud Security With Oracle Identity Cloud Service (IDCS) Click here
  • Oracle Identity Cloud Service (IDCS): Step By Step Lab Activity Guide for Beginners Click here
  • Oracle Identity Cloud Service (IDCS) Overview & Concepts Click here
  • Cloud Security Using Identity Cloud Service Click here
  • Oracle Identity Cloud Service: Configuring Multi-Factor Authentication (MFA) Click here
  • High-level Steps to Protecting an On-premises Application with IDCS by Using WebGate Click Here
  • OIM/OIG – IDCS Connector Integration : [Troubleshooting] InvalidCredentialException: HTTP 401 Error : User not authorized to execute service Click here

References

Register for Free Master Class on Cloud Security Using Oracle IDCSCareer Path & What to Learn? 

Next Task for You

Download our FREE Guide i.e., 7 Docs Must Read to Become Expert in Cloud Security With Oracle Identity Cloud Service (IDCS).

Click on the image below to Download the Guide:


The post OIM/OIG – IDCS Integration : [Solved] javax.net.ssl.SSLHandshakeException : PKIX path building failed appeared first on Oracle Trainings.

Intel Microarchitectural Data Sampling (MDS) Vulnerabilities & Its Mitigation in Oracle Cloud

$
0
0

If you are running your workload Oracle Cloud (Compute, Databases), read this complete blog and apply the patches as recommended.

Recently Intel has identified a Vulnerability in their processors which they named as Microarchitectural Data Sampling (MDS) Vulnerability and due to which Intel CPUs may allow information disclosure and one can easily enter your system by using some malicious codes.

This post covers things you must know about Microarchitectural Data Sampling (MDS) Vulnerability & what Oracle Recommends to mitigate this.

What is Microarchitectural Data Sampling (MDS) Vulnerability?

It is referred to as Microarchitectural Data Sampling issues (MDS issues) because they refer to issues related to microarchitectural structures of the Intel processors other than the level 1 data cache and one can easily run some malicious code against these and can enter your system and Intel has rated this Vulnerability as severity medium.

These vulnerabilities have received the following CVE identifiers, where CVE stands for The Common Vulnerabilities and Exposures (CVE) system provides a reference-method for publicly known information security vulnerabilities and exposures

  • CVE-2019-11091: Microarchitectural Data Sampling Uncacheable Memory (MDSUM)
  • CVE-2018-12126: Microarchitectural Store Buffer Data Sampling (MSBDS)
  • CVE-2018-12127: Microarchitectural Load Port Data Sampling (MLPDS)
  • CVE-2018-12130: Microarchitectural Fill Buffer Data Sampling (MFBDS)

Where vulnerability CVE-2019-11091 has received a CVSS Base Score of 3.8, the other vulnerabilities have all been rated with a CVSS Base Score of 6.5.  Where CVSS stands for Common Vulnerability Scoring System

Oracle Recommendation to Intel Microarchitectural Data Sampling (MDS) Vulnerabilities


Oracle Hardware

  • Oracle suggests the administrators of x86-based Systems to carefully analyze the impact of MDS on their system, and accordingly implement all the security mitigations such as applying OS patches released for these vulnerabilities.
  • If you are using Oracle Engineered System such as Exadata Machine, Database Appliance, SuperCluster, etc Oracle will give you the specific guidance.

Oracle Operating Systems (Linux and Solaris) and Virtualization

  • If you are using  Oracle Linux 7, Oracle Linux 6, &  Oracle VM Server for X86 Products you should immediately apply the OS patches released by Oracle for this Vulnerabilities, in addition to that you should also run the current version of the Intel microcode to mitigate these issues (#  yum update microcode_ctl ).
  • The required versions of microcode_ctl rpms are Oracle Linux 7: microcode_ctl 2.1-47.0.4 & Oracle Linux 6: microcode_ctl 1.17-1002
  • For Oracle Linux customer you can use Oracle Ksplice tool to patch the OS with zero downtime. To know more check here
  • If you are using Oracle Solaris on x86 then it is affected by these vulnerabilities. For more information check  Doc ID 2540621.1 
  • If you are running your workload on Oracle Solaris on  SPARC, then no action required from your end, as it is not affected by this Vulnerabilities.

Oracle Cloud

  • If you are using Oracle Autonomous Database (ATP & ADW) then no action required for this Vulnerabilities. To know more about Autonomous Database check here
  • If you are using Bare Metal Instances and using your own virtualization stack on top of it then you should review the Intel recommendations about these MDS vulnerabilities and make the recommended changes to their configurations.
  • If you are using VM Instances, then you should patch OS to the latest security patch released by Oracle. To know how to patch please check here
  • For Zero Downtime Patching in Oracle Cloud, you can use Oracle Ksplice only available for Oracle Linux Images, to know how to configure check  here
  • Note: If you are using third party OS, then you should reach out to them for these vulnerabilities patches.
  • If you are running your DB System on Virtual Machine or Bare Metal, you should apply the latest OS Patches, to know how to apply  the OS patch to DB System check here
  • For Exadata DB systems, apply the OS patches following the instructions in Updating an Exadata DB System.
  • If you are using Oracle Cloud Infrastructure Classic and Oracle Platform Service on Oracle Cloud Infrastructure Classic then Oracle will be performing mandatory maintenance for Infrastructure and Platform Services on Oracle Cloud Infrastructure Classic, so no action required from customer ends.

Hope you find this blog useful and make sure you update and apply all the security patches as recommended in order to mitigate this Microarchitectural Data Sampling (MDS) Vulnerabilities and comment in the blog & let us if you have any query regarding this Vulnerabilities.

References

Related/Further Readings

If you want to take your career to next level by becoming Oracle Certified Cloud Architect even if you are a beginner then I would like to invite you to Join my FREE Masterclass on How To Become Oracle Certified Cloud Architect [1Z0-932] in 8 Weeks

Click on the image below to register for Free MasterClass

Register this FREE Masterclass to Become Oracle Cloud Certified

The post Intel Microarchitectural Data Sampling (MDS) Vulnerabilities & Its Mitigation in Oracle Cloud appeared first on Oracle Trainings.

[Troubleshooting] EBS Cloud Manager 19.1.1 Deployment Issue because of IAM Policy/Compartment: ProvisionOCINetwork.pl

$
0
0

This post covers an Error encountered while Deploying EBS Cloud Manager 19.1.1 as part of our Hands-On-Lab Exercise for Module 4 (Provision EBS Using EBS Cloud Manager Tool) from our training Build, Manage & Migrate EBS (R12) On Oracle Cloud (OCI) (for free masterclass register here and the workaround used.

Error: 
Oci_core_route_table. demoEBSCM_apps_route_table: Service error:NotAuthorizedOrNotFound. Authorization failed or requested resource not found.. http status code: 404
Oci_core_security_list. demoEBSCM_apps_seclist: Service error:NotAuthorizedOrNotFound. Authorization failed or requested resource not found.. http status code: 404

The issue we have faced While performing the steps to Create the Network for the Oracle EBS  Environments while running below script:

 perl ProvisionOCINetwork.pl

Before the Oracle E-Business Suite Cloud Manager can be used to provision environments, a network and associated network profiles must be created. This Script creates two Profiles, one for One-Click Provisioning & another for Advance Provisioning & all the network resources (Subnet, Route Table, Security List) for these profiles.

Before moving into the Issue & its workaround, Lets first understand what is EBS Cloud Manager

What is EBS Cloud Manager?

As an Oracle Apps DBA, EBS Architect, it is important for you to know about EBS Cloud Manager.

EBS Cloud Manager

EBS CLoud Manager is a Tool (Virtual Machine) that centrally manages all your EBS Environments on the cloud.
Using EBS Cloud Manager you can do:

  • Environment Deployment
  • One-Click provisioning with pre-populated deployment options (Single Node, Demo)
  • Advanced provisioning with user-selected deployment options
  • Lift and Shift Migration to OCI from on-premises backup
  • Lifecycle management
  • Clone the environment
  • Delete the environment
  • Separation of Duties: Multiple Compartment, groups, and Network Profiles
  • Backup & Recovery
  • TDE for Compute DB instance
  • More use cases in pipeline like Adding additional node, HA & DR

if you are working on Oracle E-Bussiness Suite R12 it is important for you to know how Oracle EBS is Deployed on Oracle Cloud Infrastructure (OCI) check here

Separation of Duties in EBS Cloud Manager

As we all know now in 19.1.1 concept of Compartment is implemented broadly and with the same Segregation of Duties with various administrators can be achieved.

With the latest release (19.1.1) Oracle has introduced a Separation of Duties, which means you have 3 different roles, you will define the appropriate privileges & permissions & then the responsible team will pick the task accordingly

Different Roles

Note: To know more about EBS Cloud Manager: New Release 19.1.1 Separation Of Duties, click here

So during the Setup, we have created 3 users

  • Network Administrator (network.admin)- One who manages all network resources and components in network components
  • Cloud Manager Administrator (ebscm.admin)– One who manages Cloud Manager and maintain it.
  • EBS Administrator (ebstest.admin)– One who manages EBS instances on Cloud Manager.

Policy Creation

Now when we go during the setup we create policies as per the role so we give privileges to the Network Administrator for creating Network resources in Network Compartment and other users will have only privileges to use these resources and not to alter or create a new one.

Let’s understand about Policy

What is Policy? 

A policy specifies who can access which Oracle Cloud Infrastructure Resources (Compute, VCN, Object Storage, Database, etc). A policy allows a group to work in certain ways with specific types of resources under a particular compartment

  • Policies are comprised of one or more statements.
  • It specifies which groups can access, what resources. Also, it plays a role in the level of access users have in a particular group.
  • Policy, attached to a group defines who can access what under a Tenancy or Compartment.

Network Compartment Policy

ISSUE

While performing the steps to Create the Network for the Oracle EBS Environments

Once we complete the setup then towards the end we need to create Network resources in Network compartment for deploying Oracle EBS instances.

We need to run the script for the same:

network configure script

It takes parameter:

  • Enter tenancy ocid: ocid1.tenancy.oc1..aaaaaaaas6bozx6wkz6a3zy4cniva7jxgxh7eybvvvpdtytakm5qvrln72aq
  • Enter region: eu-frankfurt-1
  • Enter user ocid: ocid1.user.oc1..aaaaaaaaawqh3kwaxwxoo2zb53u2fl33alg5uf4qyqf7y2wvuwl4gloxzcsq
  • Enter fingerprint of the public key: aa:b3:59:43:dc:a7:15:c8:38:f0:bc:da:83:d0:94:e8
  • Enter absolute path of private key of API signing key: /u01/install/APPS/.oci/oci_api_key.pem
  • Enter unique identifier for the EBS network: ebsdemo
  • Enter network compartment ocid: ocid1.compartment.oc1..aaaaaaaa7mduvobj3s6z7wdskw3jyquxbjru6pxqgttxj4rqarmvhksg5jha

Now when we give all the required details at the end it says :

Oci_core_security_list. demoEBSCM_apps_seclist: Service error:NotAuthorizedOrNotFound. Authorization failed or requested resource not found.. http status code: 404

Network Script Error

CAUSE

If we analyze the error it means that EBS Cloud Admin user will not be able to create Network resource because it has got privilege only to Use and not to Create.

ISSUE 2

Looking at that when we used network admin user as the creation of network resources is Network administrator responsibility so we use OCID of network user but with that, the network compartment was not recognized at all and it leads to below issue:

Network compartment invalid OCID

Workaround

So as a workaround we added one rule in the policy which gives privileges to manage the network resource to ebscm.admin user (Cloud manager user).

Policy to manage ebs cm user

And thus when we ran the Network Provisioning script it went successful.

network provision script

Network Profile Completed

Well, this is the workaround as it allows the Cloud Manager Administrator to create Network components and thus breaches the Separation of Duties concept which got introduces.

We are in touch with the Oracle for getting the solution for the same and also we are trying and investigating on the same from our side to get this resolved.

But definitely, Compartment concept introduced by Oracle is going to help organizations to execute the tasks in a smoother and secure way. Compartment being logical concepts gives physical imprint on EBS Cloud Manager.

Related/References

Next Task For You

If you are an Oracle Apps DBA and just starting out your journey to Oracle public Cloud then we highly recommend you to download our FREE Guide that contains 7 Things Every Oracle Apps DBA & Architect Must Know To Build & Manage EBS (R12) On Cloud in order to Manage & Migrate Oracle EBS R12 on Oracle Cloud.

Click on below image to get the FREE Guide.

EBS on Oracle Cloud Free Guide

The post [Troubleshooting] EBS Cloud Manager 19.1.1 Deployment Issue because of IAM Policy/Compartment: ProvisionOCINetwork.pl appeared first on Oracle Trainings.


Oracle Integration Cloud Service(ICS): Using ICS to connect to Social Media [Part 1]

$
0
0

In today’s world, influencing people through social media is not a luxury, but a necessary part of every company’s growth strategy. In this blog series, we will use ICS to connect to social media like LinkedIn and post messages.

Use case:

A company has the requirement to advertise an available position automatically on LinkedIn. This can happen when a new position is created, or when someone leaves the company, resulting in that position being vacant. For the purpose of this POC (Proof of concept), we are going to mimic the company’s resource management system with SOAPUI (open-source web service testing application for service-oriented architectures (SOA) and representational state transfers (REST)). SOAPUI/Resource Management system sends a REST request to ICS as and when a position is available with the following two fields:

  • Destination: The destination platform where the opportunity will be posted, in this case, LinkedIn.
  • Message: The actual message that has to be posted on LinkedIn/Twitter.

Implementation and Testing:

The implementation will be done in three parts:

1) Part 1: We create a connector from ICS to LinkedIn.

2) Part 2: Create the orchestration, request and response mappings

3) Part 3: Create a mock client using SOAPUI, and test the flow

First Part will be covered by this blog, the next steps will be covered by the next blogs in the series.

So, lets we start off with creating a connection to LinkedIn. First, you have to configure your LinkedIn account so it can accept connections from ICS. Since the process is well-documented at https://docs.oracle.com/cloud/latest/intcs_gs/ICSLI/GUID-7A6854EE-4ED9-4978-8DB7-EF0A7C2C5CDD.htm#ICSLI-GUID-6CD39FBD-7E66-4DB2-997D-EEE3EB3CFBBE, We would not repeat it in this blog. After that, you have to perform the below steps:

1)  Access Oracle Integration Cloud Service Console.

For those who are new to ICS, Please check our previous blog post here to create a new ICS account and how to access it.

2)  Click on ‘Connections‘ on the home page, and then ‘New Connector‘. This opens up a window with all the available type of connectors. Search at the top or scroll down for ‘LinkedIn‘ connector.

Different Type of Connector

3)  Click on the connector, a new window opens up for entering information, name your connection to LinkedIn.

Information about New Connection

4)  After this, click on ‘Configure Security’ at the right bottom side. You would see a screen like this, provide your Client Id and Client Secret (which you got after creating your app on LinkedIn’s app console, as mentioned in the Oracle documentation to which I pointed above). The scope basically means what this connection is allowed to do on your LinkedIn account. In this case, it says it is the admin account for the company and is allowed to share things. Now, click ‘Provide Consent’.

administration account credits

5)  Now, you would probably see the below screen with an error. This is because a ‘Redirect URL’ has to be provided in your app at the LinkedIn app page. This helps the connection from ICS to LinkedIn to authorize and establish the connection. Go to the address bar, and copy the string after redirect_uri. It should look something like this: https%3A%2F%2Fintegration<companyname>nl.integration.us2.oraclecloud.com%3A443%2Ficsapis%2Fagent%2Foauth%2Fcallback.

This has to be decoded, I used https://meyerweb.com/eric/tools/dencoder/, and ended up with https://integration<companyname>nl.integration.us2.oraclecloud.com:443/icsapis/agent/oauth/callback

error message for invalid redirect

6)  Go to the LinkedIn app console, and add this decoded URL in ‘Authorized Redirect URLs’, and click ‘Update’ at the bottom.

Decode Redirect URL

7)  Now, go back to ICS, click ‘Provide Consent’, and voila! You got a connection! Click ‘TEST’ on top right to finish creating the LinkedIn connector.

Access allowed for Integration cloud service

This is all about the first part of this blog series that is creating a connector from ICS to LinkedIn. In the next Part of this blog series, we will cover Creating the orchestration, request and response mappings, Create a mock client using SOAPUI and then will test the flow.

So Stay tuned for our next blog post!

Next Task for you:

Did you get a chance to download our FREE Guide i.e., 6 Documents Every Oracle Cloud integrator must read? If NOT, then get it now by clicking on the image below.

If you liked this post then share with Your Friends over Social Media!

The post Oracle Integration Cloud Service(ICS): Using ICS to connect to Social Media [Part 1] appeared first on Oracle Trainings.

[Q/A] EBS (R12) on OCI : Is Goldengate Certified for EBS Migration to Cloud??

$
0
0

This post covers one of the most common questions we get from trainees in our  Build, Manage & Migrate EBS (R12) On Oracle Gen2 Cloud (OCI) Training (To register for our FREE Master Class, Click here) that is “Can we use Oracle Goldengate tool to migrate EBS to Oracle cloud infrastructure (OCI)?”

Oracle GoldenGate Overview:

Before coming to the question, let me first tell you what is Goldengate. Oracle GoldenGate (OGG) provides near real-time transactional data replication. Replication may be uni-directional, bi-directional or multi-dimensional. For more information, check our blog here.

EBS (R12) Migration on Cloud Overview:

You can migrate EBS(R12) on Cloud using Cloud Manager tool. This tool can be used to Create, Manage, Configure Oracle application on Oracle Cloud (OCI) (To know more about this tool, Click here). After setting all the pre-requisites, you have to run EBSCloudBackup.pl script from Clone utility to backup your EBS (R12) instance to Cloud and then you can provision EBS on Cloud using that backup. But in this method, little downtime will be required. As we can use Oracle Goldengate to migrate the normal database without downtime so can this be possible in case of EBS on Cloud migration as well? We will discuss this query in our post further.

To know more about cloud migrations, check our below blog posts.

So let’s now proceed with the Query.

Que. Can we use Oracle Golden gate tool to migrate E-Business Suite (EBS) to Oracle Cloud infrastructure (OCI)?

Ans. No, Oracle GoldenGate does not currently support the replication of all of the datatypes that are used by the E-Business Suite (EBS). EBS uses Oracle Advanced Queues, which under metadata tables use the ANYDATA data type. This particular data type is not currently supported by Oracle GoldenGate.  As all data types are not supported by Golden gate for EBS migration so we cannot use it.

Then what are the other options to migrate EBS (R12) to Cloud??

1) If your EBS is platform compatible then you can do lift and shift directly using Cloud Manager Tool. To know more check here. But in this case, little downtime will be required. In this manual process, you need to follow below steps:

  • Create Target resources in the Cloud.
  • Clone the Database and Application,
  • Prepare and transfer to the cloud
  • Create and Configure in DB tier and Application Tier in Cloud.

2) If your EBS is on a different platform then you first need to do platform migration and then you can perform the lift and shift directly. You can follow the below Doc IDs from Oracle.

  • Oracle E-Business Suite Upgrades and Platform Migration (My Oracle Support Note 1377213.1)
  • For EBS 12.1 Platform migration, follow Doc ID 2473448.1
  • For EBS 12.2 Platform migration, follow Doc ID 2473449.1

3) If you don’t want any downtime then you can use Dataguard (For now, only compatible with compute systems, not with DB systems). To do the same, you first need to provision compute image on the cloud and then configure dataguard. When you are ready to migrate then switchover which will avoid downtime.

This post is from our Course “Build, Manage & Migrate EBS (R12) On Oracle Cloud (OCI)” where we are using compute to build & manage EBS on Cloud and cover lots of advanced topics as well like Cloning, Backup and Restore, Lift and shift, Troubleshooting, etc.

References:

  1. GoldenGate 12c Certified with E-Business Suite 12.2
  2. Check Deploying Oracle GoldenGate to Achieve Operational Reporting for Oracle E-Business Suite (Doc ID 1112325.1)
  3. Using Oracle GoldenGate to Replicate Data from Oracle E-Business Suite 12.2 (Doc ID 2004495.1)
  4. Low Downtime E-Business Suite Migrations using Oracle GoldenGate

Related Posts:

Next Task For You

If you are an Oracle Apps DBA and just starting out your journey to Oracle public Cloud then we highly recommend you to download our FREE Guide that contains 7 Things Every Oracle Apps DBA & Architect Must Know To Build & Manage EBS (R12) On Cloud in order to Manage & Migrate Oracle EBS R12 on Oracle Cloud.

Click on below image to get the FREE Guide.

EBS on Oracle Cloud Free Guide

The post [Q/A] EBS (R12) on OCI : Is Goldengate Certified for EBS Migration to Cloud?? appeared first on Oracle Trainings.

[Solved] RW-50016: Error: – {0} Not Created During EBS R12.1 Installation

$
0
0

In this post, we are going to cover the issue and fix that one of our trainees were facing while Installing Oracle EBS R12.1. They were getting this error RW-50016: Error: – {0} was not created:

The following error occurs during the post-install check don’t worry we have got you covered in this blog.

RW-50016: FNDWRR.exe

RW-50016: FNDWRR.exe


Issue:

The following error occurs during the post-install check:

If you click on the cross before the Login Page you will get this error.

  checking URL = http://<hostname>.<domainname>:<port>/OA_CGI/FNDWRR.exe

  RW-50016: Error: - {0} was not created:
  File = {1}

Symptoms:

If you HTTP is not validated, then other install checks after, HTTP will also fail as they depend on HTTP for their functionality.

For this let’s check the status of Apache Web Server Listener go to scripts home and then check the status of adapcctl.sh.

Using applmgr user run the following command:

  1. cd $ADMIN_SCRIPTS_HOME
  2. adapcctl.sh status

You will find that the HTTP_Server is down.

RW-50015 Error HTTP Listener

RW-50015 Error HTTP Listener

Cause:

This error is Cause due to a missing library (/usr/lib/libdb.so.2).

Solution:

For this, open a new terminal and go to your scripts home.


    1. cd $ADMIN_SCRIPTS_HOME
    2. ./adstpall.sh apps/apps (Shut all application services)
    3. Create the below link for library file
    4. ln -s   /usr/lib/libgdbm.so.2.0.0  /usr/lib/libdb.so.2
    5. ./adstrtal.sh apps/apps (Startup all application services)
    6. Now press the Retry button.
      RW-50015 Error HTTP Listener

      RW-50015 Error HTTP Listener

    7. You will find that all the Validation check completed successfully.


Now check the Apache Web Server Listener and you will find that all the Web server listener is up and running.

Using applmgr user run the following command:

  1. cd $ADMIN_SCRIPTS_HOME
  2. adapcctl.sh status
RW-50015 Error HTTP Listener

RW-50015 Error HTTP Listener

You will find that the HTTP_Server is Alive.


Please share this Blog with your friends/Colleagues and stay tuned for our upcoming blogs.

Related/Further Readings

This post is from our Oracle Apps DBA (R12.2) Training, in which we cover  Architecture & Changes in Oracle E-Business Suite R12.2, Staging & Installation, File System & Important Files in R12.2, Start/Stop, Patching, AD Administration, Cloning, Concurrent Managers, AutoConfig, Password Management and Troubleshooting and much more

Next task for you

Want to Know More about R12.2? Click on the image below, and get your FREE Guide 6 Docs Every Oracle Apps DBA Must Read for R12.2

The post [Solved] RW-50016: Error: – {0} Not Created During EBS R12.1 Installation appeared first on Oracle Trainings.

[Part 2]: Using Oracle ICS to connect to Social Media (LinkedIn) | K21 Academy

$
0
0

This blog is the second part of series “Using ICS to connect to Social Media (LinkedIn)“. Click here to check the first part of Blog that is Creating Connector from ICS to LinkedIn. In this blog, we will Create the orchestration, request and response mappings.

Once you create Connector from ICS to LinkedIn as shown in Part 1 here, now next step is to create the orchestration. Here are the steps for same.

1)  Now, we have got the connection to LinkedIn up and running, we need to configure a connector which can accept incoming REST requests from the company’s resource management system/SOAPUI. Go back to ‘Connectors’, and create a new REST connector. Name the connector and select role as ‘Trigger’. Click ‘Create’. The specific details for this REST connection (like the format of request that it would expect) would be configured when we integrate with our main Integration. Click ‘Test’ on the right top side, completing the configuration of the REST connector.

Information to fill for New Connection
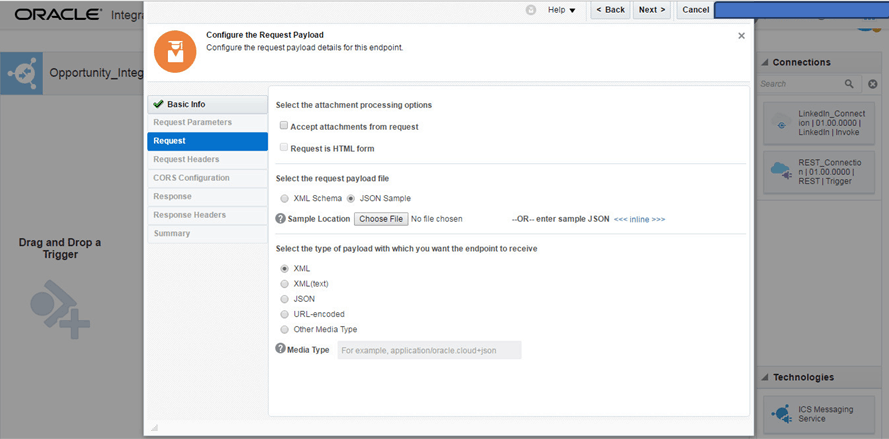
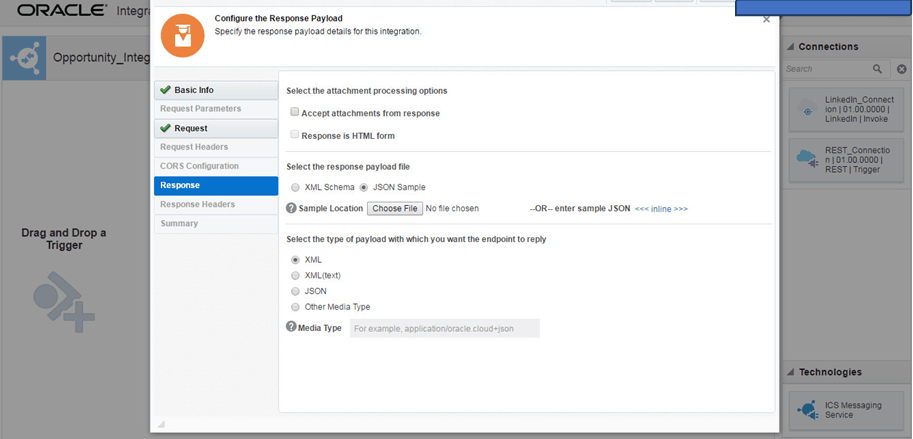
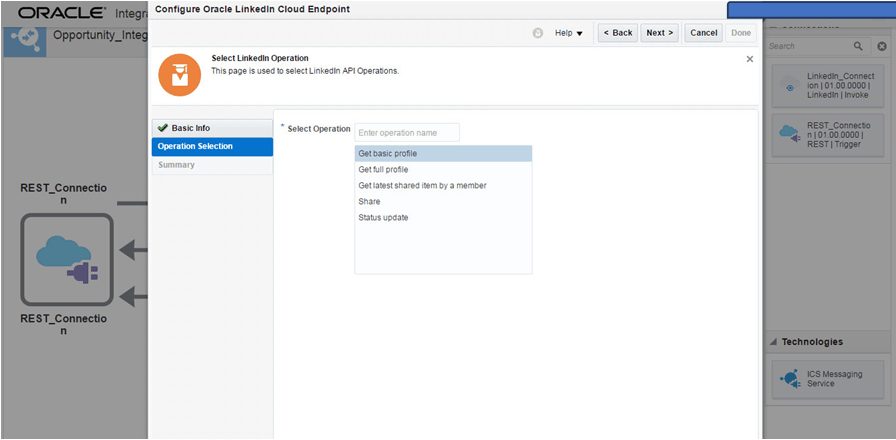
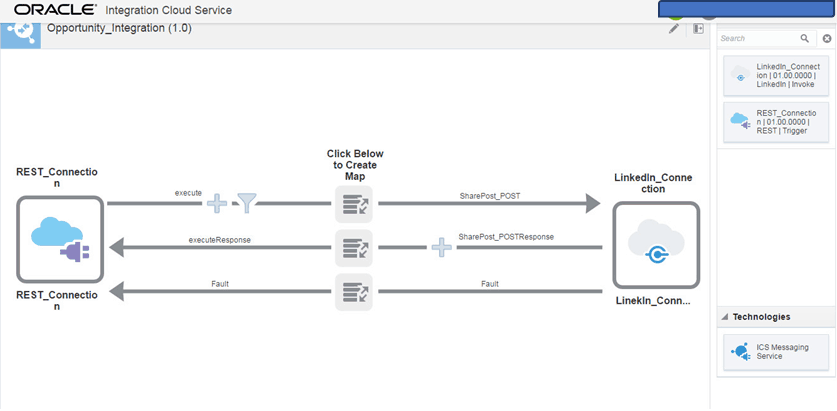
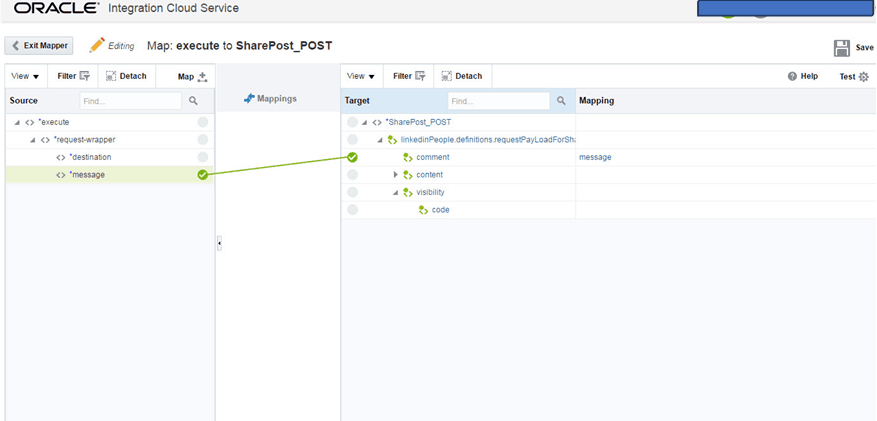
This completes the configuration of the LinkedIn connector.

2)  Go back to the homepage, and create a new integration. There are four options, for the purpose of this POC, we will select ‘Basic Data Map’.

Creating a new Integration Style and Pattern

3) Now, you are presented with the below screen. On the right, you see all the connectors which are available for use in the integration (only connectors which have been tested successfully are available, any in-progress connectors are not displayed).

Select from available connector

4)  Drag and drop the ‘REST_Connector’ to the left-hand side of the integration, which should present this screen. Fill in all the options. Two fields to pay special attention are ‘Resource URI’, which should ideally be something in line with what this connector is supposed to do, in this case, post an opportunity; and the action this endpoint will perform. Click ‘Next’.

Configuration wizard

5) Now, we have to provide a sample JSON (JavaScript Object Notation) request, so that the REST connector knows the format in which to expect the incoming request. Click ‘inline’ next to ‘enter SAMPLE JSON’, and enter
{
“destination”: “LinkedIn”,
“message”: “We have a new opportunity https://www.accenture.com/cn-en/careers/jobdetails?id=00352101_en”
}
This is the message that would be sent to this connector from SOAPUI, transformed, and then posted on LinkedIn. Click ‘Next’.

Configuring Request Payload

6) Now, we get to configure the response part. Provide the below JSON sample(same as the request part) and click ‘Next’.
{
“Acknowledgement”: “818843070175252482”,
“Details”: “Tue Jan 10 15:32:55 +0000 2017”
}

7)  You are done with configuring the incoming REST request. On the next screen, click ‘Done’. Now, go back to the integration, and drag and drop the ‘LinkedIn Connection’ to the right side of the integration. Once you provide the name, you would get a list of operations that the connector can perform on the LinkedIn API for you.

8)  Select ‘Share’, and click ‘Next’, and then ‘Done’. This finished the configuration of the LinkedIn connection in your integration. You should have been brought back to the integration home screen now. All that remains is to create request and response mappings. Click on the first icon below ‘Click Below To Create Map’, and click ‘+’ which would help us create the request mappings.

9)  Now, you should see a screen like the below. Drag and drop ‘message’ in the request to ‘comment’ in response. Also, there is something else we have to do, i.e. tell the adapter with whom our post should be shared. In our case, it would be set to ‘anyone’, however, you can also set it to ‘friends’ or ‘friends of friends’. Expand the ‘visibility’ attribute in response, and click on ‘code’.

10) Write ‘anyone’, click ‘Save’ and then ‘Close’. Then click ‘Save’ again and then ‘Exit Mapper

11)  Now, click on the response mapping icon (just below the request mapping icon which you previously clicked). This should bring you to the below response mapping screen. Map ‘UpdateKey’ from left to ‘Acknowledgement’ at right, and ‘UpdateURL’ to ‘Details’. This mapping would enable the client (SOAPUI) to confirm that the message was posted. Click ‘Save’ and ‘Exit Mapper

Oracle ICS mapping

12) All the components of your integration have been configured now. The REST adapter, to accept the incoming request and provide acknowledgment to the client, the request and response mapping, for transformations, and the LinkedIn connector, to post the message and get an acknowledgment from LinkedIn. Just one more thing that needs to be configured, is tracking. On the integration home page, top right corner, click ‘Tracking’. Here you would see our request structure at the left and a few empty fields on the right. Drag and drop both our request fields, destination and message to two empty fields on the right. Tracking is mainly used for tracking a particular message, on the basis of data provided in that field. For example, here our primary field for tracking is ‘message’, that means later you can search for all messages containing ‘Architect’ or ‘Netherlands’, or anything else. After you are done, click ‘Save’, which would bring you to the integration homepage. Save and exit the integration.

This is all about the second part of this blog series. In the next Part of this blog series, we will Create a mock client using SOAPUI and then will test the flow.

So Stay tuned for our next blog !

This post is from our Oracle Integration Cloud Services Training where we also cover about configuring Adaptors and connections, Configuring integrations, Data Mapping, Lookups, SaaS, On-premises integration agents, Security, Schedules, Versioning, Activating, Monitoring integrations and much more.

Next Task for you:

Did you get a chance to download 6 Documents Every Oracle Cloud integrator must read? If not, then get it now by clicking on the link below.

If you liked this post then share with Your Friends over Social Media!

The post [Part 2]: Using Oracle ICS to connect to Social Media (LinkedIn) | K21 Academy appeared first on Oracle Trainings.

[QA] RAC Database On Oracle Cloud (OCI) IP Address Requirement

$
0
0

This post covers one of the Q/As asked in our DBA To Cloud DBA Training live session  (for free masterclass register herethat how IP Address Space Allocation In 1-node or 2-node RAC  In compute /bare metal DB system in Oracle Cloud Infrastructure (OCI)

In generic 1-node Oracle database is a single database instance working for your application &  RAC (Real Application Cluster) is (more than one node )multiple databases instances supporting your application at the same time & Oracle RAC (Real Application Cluster) provides high availability and scalability for Oracle Database. To know more about RAC In Cloud check here

2-node RAC In OCIKeys Point About RAC In Cloud (OCI)

  • In Oracle Cloud Infrastructure User-Managed Database can be created on 1)Virtual Machine 2)Bare Metal &  3)Exadata. 2-node. You can create a RAC database either on VM based DB System & Exadata based DB System. Note: RAC is not supported in Bare Metal DB System
  • Database editions supported in Oracle Cloud Infrastructure are 1)Standard Edition 2)Enterprise Edition 3)Enterprise Edition – High Performance 4)Enterprise Edition – Extreme Performance & only Enterprise Edition – Extreme Performance supports  2-node RAC DB systems.
  • You can set up the maximum of  2-node RAC in VM DB System
  • You can set up a maximum of 8-node RAC in Exadata DB System
  • When you provision a 2-node RAC DB systems, the system assigns each node to a different fault domain. To know about fault domain check here

Creating RAC Database on Oracle Cloud Infrastructure (OCI)

To create a 2-node DB System in Oracle Cloud Infrastructure (OCI), go to the cloud console and click on launch DB System then under Total Node Count select 2 & Oracle Database Software Edition should be Enterprise Edition – Extreme Performance.

To know the complete the process of Creating DB System in Oracle Cloud Infrastructure check here

RAC IN OCI

IP Address Space Allocation In 1-node or 2-node RAC DB system In OCI

When you create DB System in Oracle Cloud Infrastructure, the very first thing you need to create Virtual Cloud Network and within that network, you create subnets which can be either public or private based on your requirement, so while creating subnets you need to have clarity that what  will be your CIDR range you should give & how many IP’s are required  if you are creating either 1-node or 2-node RAC  In compute /bare metal DB system in Oracle Cloud Infrastructure.

To know more about various Networking Components such as VCN, Subnet (Public /Private), CIDR, IGW, DRG, etc check here

1-Node Bare Metal or Virtual Machine DB System

Below is the complete IP address allocation for 1-node DB System.

  • 1 IP for Client Request
  • 3 IP’s are reserved for Subnet
  • Minimum Subnet CIDR range we should define when we creating 1-Node Bare Metal or Virtual Machine DB System will be /30 ie  equivalent to 4 IP’s

2-Node RAC Virtual Machine

Note: If you are creating DB System In either in VM or Compute in Oracle Cloud Infrastructure, 2-Node RAC is only supported in Virtual Machine DB System. To know more about Database Offerings in Oracle Cloud Infrastructure check here

Below is the complete IP address allocation for 2-node DB System.

  • 4 IPs for Database host  1 IP per node for Client Request, 1 IP per node for Private InterConnect
    3 IPs for SCAN listener
  • 3 IP’s are reserved for Subnet
  • Minimum Subnet CIDR range we should define when we creating 2-Node Virtual Machine DB System will be /28 ie equivalent to 16 IP’s.

Subnet In OCI

Note: Best Practices says always use the larger CIDR value for you subnet as once subnet is created you cannot change the CIDR value.

Hope you find this useful and have a clear understanding of IP Addresses allocation in 1 -node & 2-node DB System in Oracle Cloud Infrastructure.

Stay tuned for my upcoming blogs in Database in OCI

Related/Further Readings

If you want to take your career to the next level by becoming DBA To Cloud DBA even if you are a beginner, then I would like to invite you to Join my FREE Masterclass on DBA To Cloud DBA: What, Why & How to Learn.

Click on the image below to register for Free MasterClass.

Database on OCI

The post [QA] RAC Database On Oracle Cloud (OCI) IP Address Requirement appeared first on Oracle Trainings.

Oracle GoldenGate Tokens

$
0
0

This post covers the Oracle GoldenGate Tokens.

Oracle GoldenGate tokens are attributes to store environment variable values, which are available on the header of trail record header. Using Oracle GoldenGate built-in function @token within the parameter files retrieves the token value.

Types of Tokens:

There are two types of tokens. They are:

  1. Pre-defined token
  2. User Tokens

1. Pre-defined Tokens:

Below lists pre-defined Oracle GoldenGate tokens.

TK_HOST Stores the hostname
TK_GROUP Stores the operating system group name
TK_OSUSER Stores the operating system user name
TK_DOMAIN Stores the hostname domain
TK_COMMIT_TS Stores the current commit transaction sequence number
TK_POS Stores the current read position
TK_RBA Stores the relative byte address (RBA)
TK_TABLE Stores the table name
TK_OPTYPE Stores the operation types (INSERT, UPDATE, DELETE or DDL)

The replicat rep2202 parameter file illustrates a basic implementation of the token by associating each row with Oracle GoldenGate environment pre-defined tokens values that can be used by other applications such as auditing.

T1C1>DESC dept

Name                            Null?    Type

———————————- ——– ———

DEPT_NO                          NOT NULL NUMBER

Loc                                       NOT NULL VARCHAR2(128)

 HOST                              VARCHAR2(100)

 GG_GROUP                  VARCHAR2(100)

 OSUSER                         VARCHAR2(100)

 DOMAIN                        VARCHAR2(100)

 BA_IND                          VARCHAR2(100)

 COMMIT_TS                 VARCHAR2(100)

 POS                                   VARCHAR2(100)

 RBA                                   VARCHAR2(100)

 TABLENAME                 VARCHAR2(100)

 OPTYPE                           VARCHAR2(100)


REPLICAT rep2202

USERID ***, PASSWORD ***

MAP ggtraining1.dept, TARGET ggtraining2.dept, &

COLMAP (USEDEFAULTS,

Dept_no = dept_no,

Loc     = Loc

        host      = @TOKEN (‘TK_HOST’),

        gg_group  = @TOKEN (‘TK_GROUP’),

        osuser    = @TOKEN (‘TK_OSUSER’),

        domain    = @TOKEN (‘TK_DOMAIN’),

        ba_ind    = @TOKEN (‘TK_BA_IND’),

        commit_ts = @TOKEN (‘TK_COMMIT_TS’),

        pos       = @TOKEN (‘TK_POS’),

        rba       = @TOKEN (‘TK_RBA’),

        tablename = @TOKEN (‘TK_TABLE’),

        optype    = @TOKEN (‘TK_OPTYPE’));

2. User Defined Tokens:

These are defined on the source system and moved to the target system for event handling, providing an extendibility for attributes that are not pre-defined by Oracle GoldenGate. Tokens are a way to capture and store data in the header of the trail file.  Once a token has been defined, captured and stored in the header, it can be retrieved, on the apply side, and used in many ways to customize what information is delivered by Oracle GoldenGate.

Follow the below steps to define the token:

  1. You define the token and the associated data.
  2. The token header in the trail file header permits up to a total of 2,000 bytes (token name, associated data, and length of data)
  3. Use the TOKEN option of the TABLE parameter in Extracts

Token data may be used in the COLMAP clause of a Replicat MAP statement, within an SQLEXEC, a UserExit, or a Macro. To retrieve the token data from the Oracle GoldenGate Trail, use the Column Conversion Function @TOKEN as input to any of the previously mentioned parameters.

In order to define a token in an extract, the definition should follow this basic syntax:

Extract ext2202

Userid ***,password ***

TRANLOGOPTIONS INTEGRATEDPARAMS(MAX_SGA_SIZE 1024)

Exttrail /ogg/dirdat/lt

TABLE ggtraining1.dept, TOKENS( SRC_CSN_TS = @GETENV(‘GGHEADER’,’COMMITTIMESTAMP’));

In the example above, the token will be populated with the timestamp of the last commit on the table it is defined against.  After restarting the extract, the token (SRC_CSN_TS) will be included in the header of the trail file.

Once the trail file is shipped to the target side and read by the replicat, the token is mapped to a column in the target table.

MAP ggtraining1.dept, target ggtraining2.dept,

COLMAP (USEDEFAULTS,

SRC_CSN_TS=@token(’SRC_CSN_TS’)

);

Tokens are simple to create, use, and are a powerful feature for mapping data between environments.

Related/Further Reading:

This post is from our Oracle GoldenGate 12c Administration Training, in which we cover the Architecture, Installation, Configuring & Preparing the Environment, DML Replication – Online Change Synchronization, Initial Load, Zero Downtime Migration & Upgrading using GoldenGate, Oracle GoldenGate Security, Performance of Oracle GoldenGate and Troubleshooting and much more.

Did you Register for the FREE GoldenGate Masterclass?

NO? So, your next task is to get yourself registered for our FREE Masterclass on Learn Oracle GoldenGate 12c for Replication & Migration to start your GoldenGate journey. Click on the image below to register for FREE.

Have a question related to Oracle GoldenGate? If YES, post them in comments below.


The post Oracle GoldenGate Tokens appeared first on Oracle Trainings.

[Solved] EBS R12.2: TNS-12560: TNS:protocol adapter error, TNS-00584: Valid node checking configuration error

$
0
0

This post covers the issue that one of our trainees from Oracle AppsDBA (R12.2): Install | Patch | Clone | Maintain training (For FREE Master Class, Click here) was facing while starting the Database listener & also includes the fixes of the Issue.

When he was trying to start the database listener, he was getting the error message: “TNS-12560: TNS: protocol adapter error, TNS-00584: Valid node checking configuration error

TNS is basically Transparent Network Substrate and mainly used for connection with Oracle Databases. It’s an Oracle computer network technology that supports homogeneous p2p(peer-to-peer) connectivity on top of other networking technologies such as TCP/IP. Oracle use tnsnames.ora to define TNS connectivity with Oracle Database.  For more information check Oracle link here.

Now let’s discuss the issue and fix that our trainee was hitting.

Issue:

One of our trainees was trying to start the database listener using below command:

lsnrctl start <listener_name>

But Database listener was failing with below error messages:

TNSLSNR for Linux: Version 12.1.0.2.0 – Production
System parameter file is /u01/oracle/PRD122_12102/product/12.1.0/network/admin/PRD12111_1702upg24/listener.ora
Log messages written to /u01/oracle/PRD122_12102/product/12.1.0/admin/PRD12111_1705ecloud05/diag/tnslsnr/1705ecloud05/prd12111/alert/log.xml
Error listening on: (DESCRIPTION=(ADDRESS=(PROTOCOL=TCP)(HOST=1705ecloud05.k21academy.com)(PORT=1532)))
TNS-12560: TNS:protocol adapter error
TNS-00584: Valid node checking configuration error

Listener failed to start. See the error message(s) above…

Cause:

The trainee was hitting this issue because of the local hostname mentioned in sqlnet.ora file (located at $ORACLE_HOME/network/admin) was not correct. Oracle no longer allows the listener to startup if an invalid hostname or IP address is specified in the invited_nodes list.  The listener will not start if any of the hosts or IP addresses are unreachable.

Workaround:

In sqlnet.ora, you will see below two node validation statements. These two statements mean the user will be able to make the connection to the nodes that are added in the Invited nodes list. You can comment out these node validation lines in sqlnet.ora file ($ORACLE_HOME/network/admin) and after that, you will be able to start the listener.

#tcp.validnode_checking = yes
#tcp.invited_nodes=(1705ecloud05.k21academy.com)

Fix:

To fix this issue, correct the name of the local hostname in below node validation line in sqlnet.ora file ($ORACLE_HOME/network/admin) and issue will be resolved. So, ensure that all the hostnames and IP addresses in the invited nodes list are reachable.

tcp.validnode_checking = yes
tcp.invited_nodes=(1705ecloud05.k21academy.com)

This post is from Troubleshooting module of our Oracle Apps DBA (R12.2) Training, in which we cover  Architecture & Changes in Oracle E-Business Suite R12.2, Staging & Installation, File System & Important Files in R12.2, Start/Stop, Patching, AD Administration, Cloning, Concurrent Managers, AutoConfig, Password Management, and Troubleshooting and much more.

Related/Further Readings

Next task for you

Want to Know More about R12.2? Click on the image below to register yourself for our Free Master Class on “How to Become Oracle Apps DBA (R12), Earn Lot More In 2019

The post [Solved] EBS R12.2: TNS-12560: TNS:protocol adapter error, TNS-00584: Valid node checking configuration error appeared first on Oracle Trainings.


Increasing Service Limit in Oracle Cloud (OCI)

$
0
0

This post covers the steps to increase the limit in Oracle Cloud (OCI).

Initially, when you create a free trial account on Oracle Cloud, there is a limitation of resources (Compute, Database, Load Balancer, etc.) which means you cannot create resources beyond their limitation and you will get the “Service error: LimitExceeded” error after the service limit is reached.

In case you are using POC or a Cloud Account for learning, and don’t want to upgrade your trial account to a paid one to increase the service limit, there is an option in your console where you can ask Oracle to increase the service limit.

If you haven’t yet registered for a FREE Oracle Trial account, Download our Step-By-Step Guide to create one.

How to increase the service limit? 

request to increase your service limits can be submitted within the Console. If a resource has to be created for which the limit has been met, prompt will be shown to submit a limit increase request. Additionally, you can launch the request from the service limits page any time by clicking the link under the Help menu. 

1. Click on the Help menu, under Support and click Request service limit increase. 

                                      Oracle Cloud Console


      2.Enter the following details: 

  • In the Primary Contact details fields, enter your name and email address of the person making the request. A confirmation mail will be sent to the mentioned email address.
  • In the Service Category field, select a suitable category for your request.
  • In the Resource field, select an appropriate resource.
  • Depending on the resource you select, additional fields might display more specific information.
  • In the Reason for Request field, specify a reason for your request. In case the request is urgent or unusual, please provide the details here.

Service Limit in Oracle Cloud Infrastructure

  3. Click on Submit Request. 

After you click on Submit Request, the request is reviewed. If your request is processed, a confirmation email is sent to the address provided in the primary contact details. 

Stay tuned for my upcoming blog where I will discuss the topics related to Oracle Cloud. Feel free to comment if you have any doubts.

Related/References

Next Task For You

If you want to take your career to the next level by becoming an Oracle Certified Cloud Architect even if you are a beginner, then I would like to invite you to Join my FREE Masterclass on How To Become Oracle Certified Cloud Architect [1Z0-932] in 8 Weeks

Click on the image below to Register for the FREE MasterClass NOW!Register this FREE Masterclass to Become Oracle Cloud Certified

The post Increasing Service Limit in Oracle Cloud (OCI) appeared first on Oracle Trainings.

[Oracle Integration Cloud] Create Instance: Step-by-Step

$
0
0

This Post covers step by step instructions to create the Oracle Integration Cloud Instance to practice integrations as mentioned in our Step-by-Step Activity Guides that you must perform.

If you are new to Oracle Integration Cloud (OIC), then check out our previous blog here as it contains all the key points that a beginner should know about Oracle Integration Cloud (OIC).

Before proceeding further, Make sure you have registered for Oracle Demo Cloud Account and if not then follow our step by step guide at https://k21academy.com/cloud01 for FREE Oracle Cloud Trial Account.

Key Points to know before Creating Oracle Integration Cloud Instance:

  1. There are two ways to create the OIC Instance:
  • Quick Start: Preselected features for quick provisioning.
  • Custom Instance (Preferred): In this, you have options to select features and number of message packs.
  1. In both types of Oracle Integration Instances, Oracle will manage instance, performance, backup, patching, upgrade, etc.
  2. Both types of Oracle Integration Instances are created on Oracle Cloud Infrastructure (OCI). To know more about OCI, click here http://k21academy.com/oci11
  3. In both the options, you have the below option to select,
  • Integration Only
  • Integration with Process Cloud

In Custom Install it looks like:

OIC Create instance

OIC Create instance

In Quick Start it looks like:

a) Oracle Integration – Enterprise: Installs both Integration & Process Cloud Features.

b) Oracle Integration – Standard: Installs the Integration feature set. (Process Feature is not included in Standard).

Oracle integration Quick Start

Oracle integration Quick Start


Steps to Create the Oracle Integration Cloud Instance:

Option I: Provision/configure Oracle Integration using Custom Options:

  1. On the My Services Console Dashboard page, click Navigation menu icon in the top left corner of the My Services Console Dashboard. Then Click Services > Integration and after that Click on Create Instance.
Oracle cloud Integration Instance

Oracle cloud Integration Instance

2. Specify the details it prompts for and click on Next. Confirm your selections, then click Confirm at last

Oracle Integration Cloud Instance

Oracle Integration Cloud Instance

3. Wait for the provisioning to complete. Once the provisioning completed, you can click on the created instance to view the details.

Option II: Provision/configure Oracle Integration using Quick Start:

1. On My Dashboard, Click on Create Instance.

Oracle Integration Cloud Dashboard

Oracle Integration Cloud Dashboard

2. Now Click on All Services and it will show the all available options for integration.

OIC Instance All Services

OIC Instance All Services

3. Now Click on Create in Integration Tile to create Integration Cloud Instance quickly.

Integration Cloud Instance

Integration Cloud Instance

4. Enter Instance name and Select the required option and Click Create.

OIC Quick Start Instance

OIC Quick Start Instance

5. Wait for the provisioning to complete. Once the provisioning completed, you can click on the created instance to view the details.

This is all in nutshell about creating Oracle Integration Cloud instance. We cover this in Provisioning Instance module of our Oracle Integration Cloud Services Training (To register for FREE Masterclass, click here) where we also cover about configuring Adaptors and connections, Configuring integrations, Data Mapping, Lookups, SaaS, On-premises integration agents, Security, Schedules, Versioning, Activating, Monitoring integrations and much more.

Stay tuned for our next post where I am going to cover Console Walkthrough of Oracle Integration Cloud!

References:

Next Task for you:

  1. If you don’t have a FREE Oracle cloud account yet, then follow our step by step guide here to get the same.
  2. Create an OIC Instance.
  3. Register for our FREE Masterclass on “Be an Integration Expert with Oracle Integration Cloud Services”? by clicking on the image below.

If you liked this post, then share with Your Friends on Social Media!

The post [Oracle Integration Cloud] Create Instance: Step-by-Step appeared first on Oracle Trainings.

Oracle Integration Cloud Services (OIC) Training: Step By Step Activity Guides/Hands-On Lab Exercise

$
0
0

This post covers Step by Step Hands-On Activity Guides that you must perform in order to learn Oracle Integration Cloud Service(OIC), (For FREE Masterclass register hereYou can use these exact steps to bring you and your team for integration with on-premise & cloud application (Oracle or Non Oracle) up-to-speed quickly for supporting Customers Moving to Cloud.

In our 8weeks Oracle Integration Cloud Service(OIC) Trainingwe cover below Modules & Step-by-step hands-on Activity guides mentioned in the post.

OIC Learning Path

OIC Learning Path

Activity Guide I: Register for Oracle Free Trial Account

The first thing you must do is to get a Trial Account for Oracle Cloud (You get 300 USD FREE Credit from Oracle to practice).

Oracle Cloud is one of the top choices for any organization looking to move ERP/financials to the cloud. In this activity guide for this section, we would look at how to register for Oracle FREE Trial Account.

Note: Get this first step by step activity guide absolutely FREE from here

Register for Oracle Free Trial Account

Register for Oracle Free Trial Account

Once you register for Oracle Cloud Trial, you should get an Email Like below from Oracle:

OIC Oracle Cloud Notification

OIC Oracle Cloud Notification

Activity Guide II: Create OIC Instance and Console Walkthrough

Once you create the Oracle FREE trial cloud account, next task is to log in to your Cloud Account and you will see OCI Console, then from My Services Dashboard, You will navigate to Integrations and create Oracle Integration Instance.

In this Activity Guide, We will walk you through the steps to navigate to OIC options in Oracle cloud after login and Access various consoles like Integration Console, Integration Designer Console.

Create OIC Instance and Console Walkthrough

Create OIC Instance and Console Walkthrough

Activity Guide III: Customer Case Study: Configure SFTP & Database for Integration

The most common integration use case is to transfer data from a file (on SFTP Server) to Database. You must know what Integration pattern to use for this use case. In this Activity Guide, you have to prepare SFTP & Database Server and define these connections in Oracle Integration Cloud.

You need to configure two adapters, one for SFTP and another for the database. So Create necessary adapters and connections to connect to the database.

Customer Case Study: Configure SFTP & Database for Integration

Customer Case Study: Configure SFTP & Database for Integration

Activity Guide IV: Customer Case Study: Extract Data from File and Load into Database using OIC

In this Activity Guide, You should use OIC (Oracle Integration Cloud) FTP adapter to read data from the file in SFTP server and load data into target system that is Database using connections made in database adapters configured in previous Hands-On Lab.

Customer Case Study: Extract Data from File and Load into Database using OIC

Customer Case Study: Extract Data from File and Load into Database using OIC

Activity Guide V: Create Advanced Routing Based On Content

You must know about the more complex integrations. For example, it might be the case that an employee who is a senior manager needs to be added to a table “Senior Managers” in addition to the “Employees” table.

Create Advanced Routing Based On Content

Create Advanced Routing Based On Content

Activity Guide VI: Migrate On-Premises Data To Cloud Database

Even though a lot of organization have moved to the cloud, they might still have some systems on-premise. The organization in our use-case has a lot of existing employee data on its on-premise database.

You must know how to Migrate the Data, that will help you earn a lot higher and grow quickly. In this Activity Guide, you must know how to migrate all the existing data on the on-premise database to the cloud database, so that all details are stored at a single place in the cloud. This makes maintenance very easy.

Migrate On-Premises Data To Cloud Database

Migrate On-Premises Data To Cloud Database


Activity Guide VII: Secure Web Service (REST, SOAP) Endpoint to Ensure Access Only by Authorized Users

Creating an employee is a very sensitive process for an organization. Therefore, the web service that we have built to create an employee should be secured to prevent any unauthorized use of it.

You must know how to secure the web-services used in Oracle Integration Cloud Service (OIC) so it can be used only by the intended authorized people.

Secure Web Service (REST, SOAP) Endpoint to Ensure Access Only by Authorized Users

Secure Web Service (REST, SOAP) Endpoint to Ensure Access Only by Authorized Users

Activity Guide VIII: Automating OIC integration to Reduce the Workload

As an organization grows, the number of employees also grow. If an organization has more than a few thousand employees, it is better to automate processes like creating an employee.

In this Activity Guide, you must know how to automate the running of the web service we have created to create an employee.

Automating ICS integration to Reduce the Workload

Activity Guide IX: Manage Integrations: Create versions & Maintenance of Integrations

You must know how to create versioning for your services so that the maintenance of your services is easy & to get additional facilities.

Manage Integrations: Create versions & Maintenance of Integrations

Manage Integrations: Create versions & Maintenance of Integrations


Activity Guide X: Error Handling & Troubleshooting in OIC

When the employee service runs, there might be a case that the database is down or our service cannot connect to the database. It is important to handle such errors so that we do not lose sensitive information due to such technical errors.

In this activity guide, you must know how to perform effective error handling of your services.

Error Handling & Troubleshooting in OIC

                                Error Handling & Troubleshooting in OIC


So these are the Activity Guides that one must perform to become an Oracle Integrator as the above guides make your learning & understanding the concepts of Oracle Integration Cloud (OIC) much easier.

If you are a Developer or an Architect working with Oracle SOA Suite, Oracle Fusion Middleware and want to learn the best way to connect cloud and/or on-premise applications

We cover all these Guides in our Step by Step Training Program for Oracle Integration Cloud Services (To register for FREE Masterclass, click here) where we also cover about configuring Adaptors and connections, Configuring integrations, Data Mapping, Lookups, SaaS, On-premises integration agents, Security, Schedules, Versioning, Activating, Monitoring integrations and much more.

What Benefits You’ll Get:

As a part of our training:

  1. Live Instructor-led Online Interactive Sessions
  2. FREE unlimited retake for next 1 Years
  3. FREE On-Job Support for next 1 Years
  4. Latest Updated Training Material (Presentation + Videos) with Hands-on Lab Exercises mentioned
  5. Recording of Live Interactive Session for Lifetime Access
  6. 100% Money Back Guarantee (If you attend sessions, practice and don’t get results, We’ll do full REFUND, check our Refund Policy)

Related Links:

Next Task for you:

Register for our FREE Masterclass on “Be an Integration Expert with Oracle Integration Cloud Services”? by clicking on the image below.

The post Oracle Integration Cloud Services (OIC) Training: Step By Step Activity Guides/Hands-On Lab Exercise appeared first on Oracle Trainings.

Dell Boomi Training: Day 1 Review/Introduction & Q/As

$
0
0

This post covers the day 1 review of the interactive live session of the Dell Boomi Cloud & Introduction to On-Premise Integration.

The purpose of this post is to give a basic overview of Dell Boomi and to highlight some features and topics that are covered in the Dell Boomi course

What is Dell Boomi

Dell Boomi is a business unit acquired by Dell in 2010 that specializes in cloud-based integration, API management, and Master Data Management.

  • Dell Boomi AtomSphere is a multi-tenant cloud-based integration platform that facilitates data and application integration.
  • It is a leading iPaas which helps to create intuitive integration on the cloud.
  • This platform has a rich set of connectors to facilitate cloud, on-premises and hybrid Integrations.

Course Agenda

If you are Working as an Administrator, Cloud Architect & as a Developer, Below are the Step by Step Modules covered in our course which you should follow in order to learn Dell Boomi Course

Dellboomi Course Agenda

Dellboomi Course Agenda

Topics that are covered in Module 1:

Below are the topics that are covered in module 1

Dellboomi Course Agenda

Dellboomi Course Agenda

Overview of Boomi Platform

The Dell Boomi platform enables customers to design cloud-based integration processes called Atoms and transfer data between cloud and on-premises applications.

To Know more about the Dell Boomi please check our previous post Terminologies Every Dell Boomi Developer Must Know

Dellboomi Course Agenda

Dellboomi Course Agenda

Introduction to AtomSphere:

Dell Boomi AtomSphere is an on-demand multi-tenant cloud integration platform for connecting cloud and on-premises applications and data.

For more information on this check Four Key Points About Dell Boomi AtomSphere Platform 

  • Application Integration /ETL: A comprehensive tool to integrate applications, SaaS, on-premise.
  • Boomi EDI: X12, EDIFACT, and HL7 standards
  • Boomi API Management: Enables rapid creation, publication, accessibility, and versioning of APIs
  • Boomi Master Data Management: Enables your data stewards to easily model match, synchronize, cleanse and enrich data across domains.
  • Data Quality: To check the address, phone, email

Dellboomi Course Agenda

Insights of Dell Boomi Platform:

  • The Dell Boomi platform at https://platform.boomi.com/  is the home of the following Dell Boomi applications.
  • The Dell Boomi platform supports:

Dellboomi Course Agenda

  • trust.boomi.com — continuously updated source of information about system availability, reliability, and performance.

Atom in Dell Boomi & AtomSphere Integration:

What is an Atom

  • At the lowest level of Boomi’s architecture is the Atom.
  • An Atom is a lightweight, dynamic runtime engine created with patent-pending technology, Boomi Atoms contain all the components required to execute an integration process.
  • There is a full-featured dashboard to monitor the status and health of all Atoms and integration processes whether they are deployed in the cloud or on-premise.
  • This is a single-tenant, single node runtime engine. It contains all of the components (connectors, transformation rules, business/processing logic) required to execute processes.
  • It is lightweight and can be installed to a local machine or virtual machine in the cloud.

Integration is the act of bringing together smaller components into a single system that functions as one.

In an IT context, integration refers to the end result of a process that aims to stitch together different, often disparate, subsystems so that the data contained in each becomes part of a larger, more comprehensive system that, ideally, quickly and easily shares data when needed.

For more information on Dell Boomi Atom, check our previous post Steps for Local Atom Installation of Dell Boomi Platform here

Dellboomi Course Agenda

Dell Boomi Deployment Model

  • Cloud
  • On-Premise.

So, that was the overview of the basic functionalities of Dell Boomi platform. To know more about Dell Boomi check our post Unique Features of Dell Boomi Platform

Q/A’s covered in Live Session

Below are few of the Question asked by our trainees on the very first day of the Live Session:

1) How can I get my credentials to access the Dell Boomi? Should I register or it will be provided?

Ans. The Dell Boomi instances are provided by K21 Academy with an access time of two months. Those who have purchased the Live Course will get free instance for the first time and those with self-paced will have to purchase the instance separately. So, you just have to practice our hands-on on the instance.

2) What is AS2 in the connector part?

Ans. AS2 (Applicability Statement 2) is a specification about how to transport data securely and reliably over the Internet. Security is achieved by using digital certificates and encryption. It is generally used for socket programming.

If you have any question please do share in the comment section.

Related Posts

NEXT Task For You!

If you have not downloaded the FREE eBook – 6 Docs Every Dell Boomi Developer Must Read yet, kindly Register and Get a copy in your Email inbox.

6 Docs Every Dell Boomi developer must read

Did You Find this Blog useful?

The post Dell Boomi Training: Day 1 Review/Introduction & Q/As appeared first on Oracle Trainings.

[Q/A] 1Z0-932 Oracle Cloud Infrastructure Architect Certification Day 1 Training Review

$
0
0

This post covers the Q/A’s & Review from the Day1 of [1Z0-932] Oracle Cloud Infrastructure Architect Training, This will help you to understand what you should learn or look for when appearing for Oracle Cloud Infrastructure Architect Certification (1Z0-932).

In this session, We covered Module 1: Cloud Concepts & Getting Started with OCI which includes the following lessons

OCI Module 1 Agenda
The course which is available on the Membership Portal looks like below. We encourage trainees to go through the well-done recorded videos before coming to the Live session so that they can come prepared with their doubts & can clear the doubts during the session to make it more Interactive.

OCI Module 1

[Q/A] Related to Training

Below are a few questions asked by Trainee, related to the course that you can use for your own learning

Q1. Any Recent Changes under Oracle Cloud Infrastructure (OCI) Architect Associate exam (1Z0-932)?

Ans. In Our Course, which is totally dedicated to Oracle Cloud Certification (1Z0-932), Updated with the latest material & latest update based on this- https://k21academy.com/1z093211
The Quiz Questions which you will get are up to date & in future, if we will get an update from Oracle, we will change it accordingly.

Q2. I am working on OIC and JCS migrations, are we going to cover it in our 1Z0-932 certification course?

Ans. No, this course is focused on OCI only. We have a separate course on OIC (Oracle Integration Cloud Services), to check & know what we are covering in OIC check here, for free faster class check here
& if you want to know about the Migration from OCI to OCI-C, please check this link

Q3. The certification is for OCI Architect “Associate”…Are there any further levels like ‘professional” or “expert”?

Ans. As of now (28th May 2019) Oracle has only OCI architect Associate. In future, Oracle may release the higher version & we will update in our Internal Whatsapp Group & on this Blog.
To Know more on Oracle Cloud Architect Certification Exam (1Z0-932), please check here

Q/A Related to the Service Model

Below are a few queries asked by our Trainees for this respective Topic

Q4. How maintenance (like backup etc) is getting handled in all cloud models.

Ans. Cloud Service Model: SaaS, PaaS, IaaS

  • Infrastructure as a Service (IaaS): Infrastructure as a Service (IaaS) contains the basic building blocks for cloud IT and it provides access to networking features, computers (virtual or on dedicated hardware), and data storage space.
  • Platform as a Service (PaaS): Platform as a Service (PaaS) removes the need for your organization to manage the underlying infrastructure (hardware and operating systems) and allows you to focus on the deployment and management of your applications.
  • Software as a Service (SaaS):  is a software distribution model in which a third-party provider hosts applications and makes them available to customers over the Internet. In most cases, people referring to Software as a Service are referring to end-user applications.

For the PaaS & IaaS Service model, Backup is done by the customer (i.e You), its the customer responsibility to maintain Backups & for SaaS Model Backup is taken care by Oracle itself.

Note: To know more about Cloud Service Model, Check here

Cloud Service Model

Q5. In the PaaS model, if the database is lost will Oracle take the responsibility to retrieve?

Ans. PaaS Model has two types of offerings, one is User managed & other is Autonomous Database

  • For Autonomous Database, if data is lost because of cloud vendors (hardware failure highly unlikely) then Oracle will recover that, however, if the Data is deleted by mistake, or due to any human error, then its customer’s responsibility to restore.
  • For User-Managed Database it is all the customer (yours) responsibility, only you need to maintain these.

 Q/A: OCI (Gen2) vs OCI-C (Gen1)

OCI vs OCI-C
Q6. Can you explain the difference between OCI Classic (OCI-C) and OCI?

Ans. OCI Classic is the old cloud offering which has older Generation Hardware & Storage, with this you can create Virtual Machine Instances
Whereas in OCI, the latest one, Oracle has offered NVME based flash Storage dedicated on the local server or network attached block volume. The Additional Service that comes in OCI is that you have Different types of Storage for Block Volume, you can choose, Standard, HIGH & DENSE.

More Importantly, you can go with OCI Bare Metal, you could go with just 52 OCPU’s in comparison to the fact that you had to take 250 OCPU’s in dedicated BareMetal in the classic cloud.
For the Other Storage Services concerned, it is more or less the same, you have Object Storage & Archive Storage in Both, these concepts remain the same even in OCI.

There are few things in OCI in terms of Service Offerings:

  • Availability Domain: Availability Domain (AD) is one or more data centers located within a region. Your Data is protected within a region by means of using AD’s
  • IAM(Identity & Access Management): In this, you will get the feature of Compartments.
  • Audit Service

OCI Classic is a Generation 1 Cloud from Oracle whereas OCI is Generation 2 Cloud
Cloud At Customer (C@C) is based on OCI-C Model. To know more on OCI vs OCI-C, please check our blog
We have also Discussed Brief on Oracle Cloud at Customer (OCI-C)

Cloud at Customer

We covered & discussed many Exam Dumps during the Live session. Check below one of Sample Quiz Question based on the above Slide

OCI Quiz Question

Note: If you know the answer for the above question, then leave a comment in the comment box below. Make sure you post the answer with the explanation why you think that it should be correct & others not.

Q/A: OCI Region, AD & FD

Then we covered about Region, Availability Domain (AD), Fault Domain (FD) in OCI.

Region

Region in OCI

Q7. What are the differences between Commercial vs Government Cloud?

Ans. There are two types of Cloud:

a) Government Cloud: Is dedicated to Government Organizations only (Federal compliant). Only government companies can access them with proper approvals, and this will be assigned by Oracle.
b) Commercial Cloud: Is not limited to one Organization but it is publicly available.

Q8. What is the importance of selecting Region? Any Significance to choose?

Ans. Depending on in which region you want to keep your data, you select the appropriate Region

Q9. Can I change the Region in Tenancy?

Ans. Once a Service/Resource is created you can’t move that to another region but you can create new Service/Resource in another region by subscribing to that region. Check how to subscribe to another region here

Q10. Is it possible to assign two Region in the same Tenancy?

Ans. As of 27th May 2019, There is a total of 7 Regions now (i.e. London Heathrow, Frankfurt, Ashburn, Phoenix, Canada, Tokyo, Seoul)
Yes, you subscribe to another region and create compute or database in different regions
Check for the Steps on how to subscribe to another region here

Q11. What is the point in setting the home Region when you can create resources in other Regions as well?

Ans. When you sign up for Oracle Free Trial Account, you will get home region by default and if you don’t change region at the time of resource creation then resources are created in that specific region.

Q12. I heard a latency issue if I am not selecting nearer one, what is that?

Ans. This is where edge service like DNS & Content Delivery Network (CDN) will comes handy.

Availability Domain (AD)

Availability Domain in OCI

Q13. How are costs distributed for 1 AD vs 3 AD, same for FD?

Ans. The cost will depend on the number of machine running
If you have 1 machine in AD1 then you will charge for 1 machine & likewise, if you have 3 machines on all 3 AD’s & FD’s then it will charge for 3 machines.

Q14. Is there any distance define, how far will be one AD with another one?

Ans. Oracle doesn’t reveal the distance between 2 ADs but Predictable low latency & high speed encrypted interconnect between ADs

Fault Domain (FD)

Fault Domain in OCI

Q15. If I had created one server and it had gone one of the fault domain, and if any issue comes on that FD, then my server or compute will automatic failover to other FD or what?

Ans. No, it will not recover automatically. You’ll have to have a backup on another FD or AD.

We’ll cover this in the HA & DR module of our [1Z0-932] Oracle Cloud Infrastructure Architect Training

Module 11 HA DR in OCI
Q16. FD (Fault Domain) is logical or it is a Physical server?

Ans. A fault domain is a Physical Server which is a logical grouping of hardware and infrastructure within an Availability Domain, Provides a higher degree of protection from unexpected hardware failures or computer hardware maintenance.

Q17. Suppose I don’t want HA for my setup, and I want to put in one FD (Fault Domain), if Oracle wants to patch that FD and need a bounce, then Oracle need to take off my server right?

Ans. Yes, for scheduled maintenance on the server, Oracle will notify about the server not being available for the specified time. You must check all services after Server is back after maintenance.

OCI Services

OCI Services

We have discussed many Services in OCI including Database

Database in OCI
Q18. Under Database, I can choose bare metal, VM and Exadata (1st option) in that option we have DB instance available for my prod and in that in case of any DB corruption and with help of gold policy backup. Will I able to retrieve the Database or Oracle will take care completely?

Ans. Under Bare Metal, Exadata & User Managed Services, you have to take backup & recovery, so in that case, you will have to take care of the backups & Recovery, Oracle will not take care of Backup & Recovery. We will cover this in detail in our Module 7.

Q19. What is CASB and how is it related to OCI?

Ans. CASB stands for Cloud Access Security Broker to alert any security violations. This is the security monitoring tool, you can secure OCI with the help of CASB.
CASB is part of our Cloud Security Course 1Z0-933 Certification 

Quiz Question[1Z0-932]

In our course, you will get the 1Z0-932 Certification Quiz question’s under every respective Module, that will help you to clear the 1Z0-932 certification.

Module I Getting Started with OCI Quiz for Certification 1Z0-932

Feedback

In Conclusion, it was a fantastic session and we have got very good feedback. All are now excited to learn Cloud technology and to Become Oracle Cloud Infrastructure Architect (1Z0-932)

Here are some of the trainee’s comment for the feedback of Day 1 Training.

Feedback from OCI day 1

These are the Feedbacks from few of our Trainee, to check the Full list of Trainees Testimonials, Click Here

Next Task For You

  1. Answer the Quiz question which we mentioned above.
  2. Begin your journey towards becoming an Oracle Cloud [1Z0-932] Certified Architect by Joining, FREE Masterclass on How To Become Oracle Certified Cloud Architect [1Z0-932] in 8 Weeks, And start preparing today to clear the Exam for Oracle Cloud Infrastructure Architect Exam-(1Z0-932) Certification.

Related/References

Click Down the image below to register for FREE Masterclass.
FREE masterclass to become Oracle certified cloud architect

The post [Q/A] 1Z0-932 Oracle Cloud Infrastructure Architect Certification Day 1 Training Review appeared first on Oracle Trainings.

Viewing all 1887 articles
Browse latest View live