This post covers some of the Q/As which were asked on Day 1 January of 2019 batch from our Build, Manage & Migrate EBS (R12) On Oracle Gen2 Cloud (OCI) Training. Many questions were asked during the Day 1, but I am sharing a handful of them, that you should also come across when you work on Oracle Cloud Infrastructure (OCI).
New To The Cloud?
I would highly recommend you check our previous post to kick start your journey to the cloud.
Topics Covered On Day1
- EBS (R12) Overview
- IaaS (OCI VS OCI-C)
- PaaS (DBCS: VM & BM, ExaCS)
- EBS (R12) Architecture on Cloud
- Provision EBS (R12) on OCI
Q1) Cloud Security, What controls are in place at the public cloud to protect customer resources across the tenancy in the multitenant environment?
As a customer, the services that you use determine the configuration work you must perform as part of your security responsibilities. Oracle Cloud infrastructure and platform services operate under a shared responsibility model, where Oracle is responsible for the security of the underlying cloud infrastructure, and you (customers) are responsible for securing your workloads as well as platform services such as Oracle Database and Oracle WebLogic Server. The following figure shows the shared security responsibilities.
- Identity and Access Management (IAM): You are responsible for securing your cloud account logins by creating individual credentials for your employees, managing & tracking what exactly they are doing on your cloud account. Wherein Oracle is responsible for providing effective IAM services such as identity management, authentication, authorization, and auditing.
- Workload Security: You are responsible for protecting and securing the operating system and application layers of your compute instances from attacks and compromises. Oracle is responsible for providing secured inbuilt images that are hardened and have the latest patches, also Oracle allows you to bring your own or third-party security solutions.
- Host Infrastructure Security: You are responsible for securely configuring and managing you’re compute (virtual hosts, containers), storage (object, local storage, block volumes), and platform (database configuration) services. Oracle has a shared responsibility with you to ensure that the service is optimally configured and secured. This responsibility includes hypervisor security and the configuration of the permissions and network access controls required to ensure that hosts can communicate correctly and that device is able to attach or mount the correct storage devices.
- Network Security: You are responsible for securely configuring network elements such as virtual networking, load balancing, DNS, and gateways, wherein Oracle is responsible for providing a secure network infrastructure.
- Client and Endpoint Protection: Your enterprise/Company uses various hardware and software systems, such as mobile devices and browsers, to access your cloud resources. You are responsible for securing all clients and endpoints that you allow to access Oracle Cloud Infrastructure services.
- Physical Security: Oracle is responsible for protecting the global infrastructure that runs all of the services offered in Oracle Cloud Infrastructure, which includes hardware, software, networking, and facilities that run Oracle Cloud Infrastructure services.
![Shared Security Model In Oracle Cloud]()
Q2) What are DBAs Roles in IaaS, PaaS & SaaS?
for SaaS: No DBA tasks apart from SaaS Admin Tasks of creating the frontend Account/Users and securing environment (whitelisting). Loading Data via Integration tools that will be specific to SaaS environment. DBA’s don’t get backend access of database in SaaS.
for PaaS: for Autonomous Database its tasks like Start/Stop, Scale-Up, Load Data, Manual Backup, Restore etc. For USer Managed Database, its previous + backup & recovery, patching, upgrades, tuning etc
for IaaS: it’s Infra task so all tasks right from installing VM to managing Data. All you get is Compute, Network & Storage
To know more about IaaS, PaaS & SaaS, check here
Q3) What is the advantage in KVM@OCI over Nimbula@OCI-C?
There is 2 type of IaaS Offerings in Oracle Cloud (OCI & OCI Classic) where OCI uses KVM and OCI-C Uses Nimbul, In our training, we cover both IaaS offering, to know more about the differences between OCI & OCI-C click here.
Coming to the question, what is the advantage of KVM in OCI over Nimbula in OCI-C, let us first understand, what is a Hypervisor?
A hypervisor or virtual machine monitor (VMM) is computer software, firmware or hardware that creates and runs virtual machines. A computer on which a hypervisor runs one or more virtual machines is called a host machine, and each virtual machine is called a guest machine.
XEN Hypervisor: It is type I Hypervisor, which means it sits a single layer above bare metal. It’s like a stripped down operating system, and it uses a function called “pass-through” to connect directly to PCI devices like RAM/CPU/NIC.
KVM Hypervisor: KVM is a Type II Hypervisor, which means that it is one layer above the OS. So you have a bare metal machine, install an OS, and THEN install KVM. In Linux, it is installed in the form of a Kernel, and this kernel then turns the bare metal machine into a Hypervisor.
If your most the workload running on Linux-based solutions, You should go with KVM. Which doesn’t mean Xen is not good. It’s just there are chances are, you’ll find KVM will offer better performance with the Linux OS and if all your applications running on Windows-based cloud servers, there are probably more advantages to hosting on Xen because of the near-native drivers.
Note: OCI-C is being phased out by Oracle & my recommendations are to move your applications & databases to Oracle Cloud Infrastructure
Q4)VMs in OCI-C and OCI have noisy neighbors. If so, why the customer should prefer VMs at OCI and not OCI-C?
VMs in OCI-C and OCI have noisy neighbors. If so, why the customer should prefer VMs at OCI and not OCI-C. The advantage in OCI over OCI-C is not just VM but underlying Network (check all networking options in OCI that is not in OCI-C), type of Storage (Block with faster Read/Write in OCI) and Shape (bigger shapes) etc.
Q5) Free/paid subscription – After I subscribe to cloud, can I create logins for my colleagues in the same tenancy on my own?
Yes, You can create it, by adding them as a user, then as per the requirement, you can grant access to the user by creating policy & groups within the same tenant.
As of Jan 2019 on both the cloud subscriptions ie.Monthly Universal Credits & Pay-as-You-Go or Promo you can create 250 users in tenancy. This is already covered in our step by step activity Setup IAM: Users, Groups, Security Policy & Rules in our Oracle Cloud Architect Certification Training.
To know more about users, group, policy click here
Q6) OCI SDK – Is this similar to JDK? how do I get this service/install it? How it is different from CLI?
Oracle SDK
SDK stands for ‘Software Development Kit’, a developer’s tools that enable one to write the code with more ease, effectiveness, and efficiency. SDKs come for various languages. They provide a lot of APIs (Application Programming Interfaces) that makes the programmer’s work easy. Yes, it is similar to JDK, SDK is more generic & SDK of Java is JDK (Java Development Kit). Oracle SDK (Software Development Kit) enables you to build up your own app which can be integrated with Oracle Cloud Infrastructure. As of now you can build and use below SDKs to build your own customized APP which can be integrated with OCI and then you can access Oracle Cloud Infrastructure resources via that Application
- Java SDK
- Python SDK
- Ruby SDK
- Go SDK
For Example, if you want to use JAVA SDKs in Oracle Cloud Infrastructure (OCI), you need to follow below steps:
To use the Java SDK, you must have the following:
- An Oracle Cloud Infrastructure account.
- A user created in that account, in a group with a policy that grants the desired permissions. This can be a user for yourself or another person/system that needs to call the API. For an example of how to set up a new user, group, compartment, and policy, see Adding Users. For a list of typical policies, you may want to use, see Common Policies.
- A key pair used for signing API requests, with the public key uploaded to Oracle, Only the user calling the API should be in possession of the private key.
- Java 8
- A TTL value of 60.
Oracle CLI
Oracle Command Line Interface enables you to access & manage various Oracle Cloud Infrastructure resources (Compute, VCN, Storage etc) through CLI. In Oracle CLI you won’t need to create it, as it by default given by Oracle which is build on Python, you just need to install it and then you can manage your OCI Resources via CLI. The CLI is built on Python (version 2.7.5 or 3.5 or later), running on Mac, Windows, or Linux.
To know more about Oracle CLI click here
Q7) SSH Keys – If I am provisioning the server using my SSH keys then how will others access the VM? Do I need to share my keys to everyone or is there any alternate way?
No, we no need to share ssh keys with anyone, in that case, we can create SSH enabled users in that compute & every user has its own ssh key to login to compute
Q8)REST API – Are REST APIs and REST Endpoints same? If not, please throw some light.
A RESTful API is an application program interface (API) that uses HTTP requests to GET, PUT, POST and DELETE data. A RESTful API — also referred to as a RESTful web service — is based on representational state transfer (REST) technology, an architectural style, and approach to communications. Whereas rest endpoint is an endpoint or target location that hosts resource/service that you want to use or act on like create a Compute or Delete a Database.
To know more about Rest API’s in Oracle Cloud Infrastructure click here
Q9)How should I reach Oracle Support for the paid (metered/non-metered) subscription related queries (IaaS/PaaS)?
Yes, you can directly contact Oracle Support either via phone or chat and all your queries will be answered regarding Cloud Subscriptions.
![Oracle Cloud Support]()
Overall, it was a fantastic session and got very good feedback. All are now excited to learn Cloud technology and transform from Apps DBA/DBA to Cloud Apps DBA.
Stay tuned for the further post. Many things to learn in Oracle Cloud!!
Related Post
Next Task For You
Want to Learn How to Manage and Migrate EBS R12 on Oracle Cloud?
Click on the Below image and Get Our Omniscient FREE Guide on 3 Docs Every Apps DBA Must Read to Manage & Migrate EBS R12 on Oracle Cloud.![FREE Guide for every oracle Apps DBA by Industry expert]()
The post Oracle EBS R12 on Cloud (OCI) for Apps DBAs & Architects: Training [1901] Day 1 Q/As appeared first on Oracle Trainings.


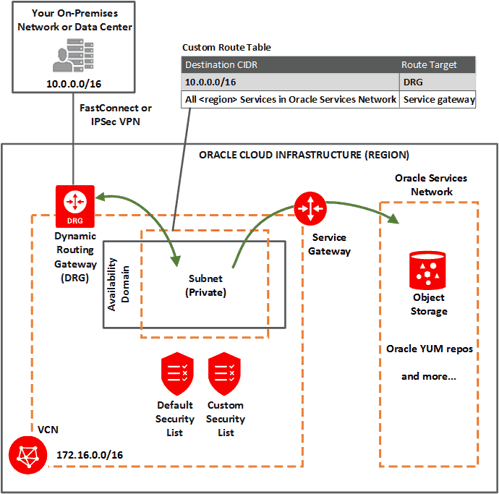
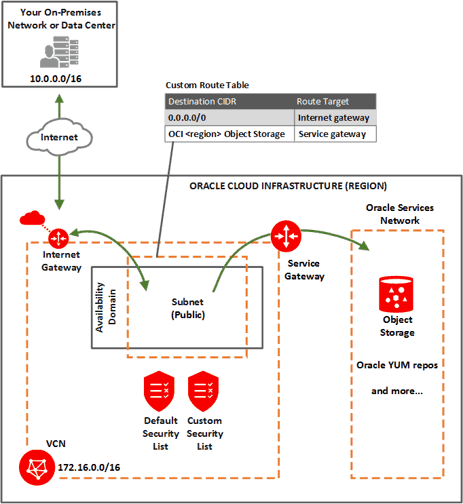
 Internet Gateway (IGW)


 3. Lab Activity Guide III: Configure VCN, Security List, IAM Policies & Connecting To DB System
 4. Lab Activity Guide IV: Managing DB System (Start, Stop Scale Up/DOwn) & DBCLI
 5. Lab Activity Guide V: Patching DB System Using Console & CLI
 6. Lab Activity Guide VI: Backup & Restore DB System
 8. Lab Activity Guide VIII: Migrate (Lift & Shift) On-Prim Database to CLoud (OCI)
 The heartbeat tables are accessed via views that provide accurate lag data and lag history.

 Database Deployment