
This blog post gives a walkthrough of the Step-By-Step Activity Guides of [AZ-900] Microsoft Azure Fundamentals training program that you must perform to learn this course.
You can use these walkthroughs to familiarise yourself with the Azure cloud processes and interface. The walk through of the Step-By-Step Activity Guides of [AZ-900] Microsoft Azure Fundamentals training program will prepare you thoroughly for the AZ-900 certification.
Activity Guides:
I: Register For Azure Free Trial Account
The first thing you must do is to get a Trial Account for Microsoft Azure. (You get 200 USD FREE Credit from Microsoft to practice)
Microsoft Azure is one of the top choices for any organization due to its freedom to build, manage, and deploy applications. Here, we will look at how to register for the Microsoft Azure FREE Trial Account, click here.
Note: Get this first step by step activity guide absolutely FREE from here
After you register for Microsoft Cloud Trial Account, you should get an Email Like the below from Microsoft:

II: Explore the learn Sandbox
Azure Sandbox is an ideal way for developers and other IT professionals to gain hands-on experience with Azure, without the need for costly hardware or infrastructure. It also enables organisations to evaluate new Azure features and services before implementing them in their production environment.

III: Create an Azure Resource :
In this lab , you’ll use the Azure portal to create a resource. The focus of the exercise is observing how Azure resource groups populate with created resources.
These resources include:
- Resource Group
- VNet
- Virtual Machine
- Public IP
IV: Create A Virtual Machine In The Azure Portal
Azure Virtual Machines (VM) is one of several types of on-demand, scalable computing resources that Azure offers. Typically, you choose a VM when you need more control over the computing environment than the other choices offer.
This Guide gives you information about what you should consider before you create a VM, how you create it, and how you manage it. An Azure VM gives you the flexibility of virtualization without having to buy and maintain the physical hardware that runs it. However, you still need to maintain the VM by performing tasks, such as configuring, patching, and installing the software that runs on it.
This guide gives you step-by-step information on how to create a Virtual Machine on the Azure cloud and install and run an IIS Web Server.
Also Check: Capex vs Opex, know their major differences!
V: Create A Virtual Network
Azure Virtual Network (VNet) is the fundamental building block for your private network in Azure. VNet enables many types of Azure resources, such as Azure Virtual Machines (VM), to securely communicate with each other, the internet, and on-premises networks. VNet is similar to a traditional network that you’d operate in your data center but brings with it additional benefits of Azure’s infrastructure such as scale, availability, and isolation.
In this activity guide, we will create an Azure Virtual Network, connect two virtual machines to the VNet, and test the connection between them.
Check out: Microsoft Azure provides governance features and services
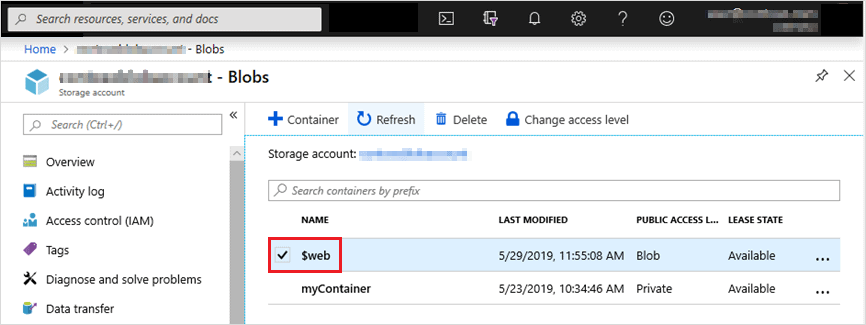
VI: Create Blob Storage
Microsoft Azure Storage provides massively scalable, durable, and highly available storage for data on the cloud, and serves as the data storage solution for modern applications.
This activity guide gives you step-by-step information on how to connect to Blob Storage to perform various operations such as create, update, get, and delete blobs in your Azure Storage account.
VII: Use The Azure Pricing Calculator
This activity guide gives you a step-by-step process of estimating the cost of hosting a sample infrastructure by using the Azure Pricing Calculator.

VIII: Use the Azure TCO Calculator
In this guide, we will be using the Total Cost of Ownership Calculator to compare and measure the costs of hosting a sample infrastructure On-premises Vs on the Azure cloud.

IX: Manage Resource Locks
As an administrator, you may need to lock a subscription, resource group, or resource to prevent other users in your organization from accidentally deleting or modifying critical resources. You can set the lock level to CanNotDelete or ReadOnly. In the portal, the locks are called Delete and Read-only respectively.
In this walkthrough, we will create a resource group, add a lock to the resource group and test deletion, test deleting a resource in the resource group, and remove the resource lock.

Related/References
- [AZ-900] Microsoft Azure Certification Fundamental Exam: Everything You Must Know
- Learn how to create a Free Microsoft Azure Trial Account
- [AZ-900] Microsoft Azure Fundamentals: Topic 1.1 Overview & Benefits
- [AZ-900] Microsoft Azure Fundamentals: Topic 1.2 CapEx vs OpEx Model
- [AZ-900] Microsoft Azure Core Services: Compute, Network, Storage & Database
- [AZ-900] Azure Subscriptions
Next Task For You
Are you still uncertain about how to begin your Azure Cloud journey? Simply click the register now button below to sign up for a FREE Masterclass on Microsoft Azure Fundamentals AZ-900 Certification. which will help you to understand better, so you can choose the right path and clear certification exam.

The post [AZ-900] Microsoft Azure Fundamental Training: Step By Step Activity Guides/Hands-On Lab Exercise appeared first on Cloud Training Program.