This blog post gives a walkthrough of the Step-By-Step Activity Guides of [AZ-104] Microsoft Azure Administrator training program that you must perform to learn this course.
You can use these exact steps to bring you and your team for integration with On-Premise & Cloud application to implement, monitor, and maintain Microsoft Azure solutions. The walkthrough of the Step-By-Step Activity Guides of [AZ-104] Microsoft Azure Administrator training program will prepare you thoroughly for the AZ-104 certification and apply for the exam click here.
- Register For Azure Free Trial Account
- Installing Powershell Core, AzureRM, AZ Modules
- Create Resource Group and ARM Templates
- Deleting Resource Group with Recovery Service Vault and Backup inside
- Create Policies, Apply Tags, Locks, Alerts and Create a Log Analytics workspace
- Generate SSH Keys
- Create a Virtual Machine and Virtual Machine Scale Set
- Create an Azure Bastion Host
- Attach Data Disk, Expand OS Disk Size, Resize VM, Enable Auto-shutdown, Add NIC and Reset Password
- Create an Azure Storage Account, Azure Storage Container, Upload Blob, and Assign File Storage To VM
- Network Access For Storage Accounts In Azure
- Creating a Virtual Network, Extra Subnet
- Network Security Group, Azure DNS Server
- VNet Peering in Azure
- VPN Gateway Connection in Azure
- Load Balancers, Traffic Manager Monitoring, and Network Watcher
- Role-Based Access Control In Azure, Custom RBAC Roles, and Microsoft Azure Directory Synchronisation
- Backup via MARS Agent
- Virtual Machine Replication via ASR
- Azure Kubernetes Cluster (AKS)
- WebApps Creation With 2 Deployment Slots
Activity Guides:
I: Register For Azure Free Trial Account
The first thing you must do is to get a Trial Account for Microsoft Azure. (You get 200 USD FREE Credit from Microsoft to practice)
Microsoft Azure is one of the top choices for any organization due to its freedom to build, manage, and deploy applications. Here, we will look at how to register for the Microsoft Azure FREE Trial Account, click here.
Note: Get this first step by step activity guide absolutely FREE from here
After you register for Microsoft Cloud Trial Account, you should get an Email Like below from Microsoft:

II: Installing Powershell Core, AzureRM, AZ Modules
Windows PowerShell is a Command-line interface that gives options to set commands instructions to azure subscription in the windows operating system.
Powershell Core is the new version of Windows PowerShell 6 and higher versions.
You can install PowerShell Core in MAC, Linux, and Windows operating systems. This is an open-source tool that is not specific to the windows operating system. This version of PowerShell supported on Windows 7, server 2008, and later versions. The latest release of PowerShell Core is the 7.1 edition.
Azure PowerShell support AZ and AzureRM modules for connecting to the Azure Infrastructure. AzureRM module is an Old module that is having some issues in it.
Microsoft Azure introduced a new module name AZ, which is used for the PowerShell environment with Azure Cloud Shell. Azure Cloud Shell is a browser-based environment where the AZ module enables compatibility.
Also check: Step by Step instructions to install the Azure Powershell module
III: Create Resource Group and ARM Templates
In Azure, a Resource Group is a logical collection of all resources. The resource group stores metadata about the resources.
It is generally created on an environment basis such as development, production, or testing resource groups.
Basically, it provides a way to monitor, control access, provision, and manage to bill for collections of assets/resources that are being used by a client.
To implement infrastructure as code for your Azure solutions, use Azure Resource Manager (ARM) templates. The template is a JavaScript Object Notation (JSON) file that defines the infrastructure and configuration for your project. It uses declarative syntax, which lets you state what you intend to deploy without having to write the sequence of programming commands to create it. In the template, you specify the resources to deploy and the properties for those resources.
This guide gives you step-by-step information on How to Create a Resource Group using Various methods like Azure Portal, PowerShell, CLI. and How to Create and Deploy an ARM Template.
Find out here – What is the difference in Data Science vs Data Analytics vs Data Engineer?
IV: Deleting Resource Group with Recovery Service Vault and Backup inside
A Recovery Services vault is a storage entity in Azure that houses data. The data is typically copies of data, or configuration information for virtual machines (VMs), workloads,
servers, or workstations. You can use Recovery Services vaults to hold backup data for various Azure services such as IaaS VMs (Linux or Windows) and Azure SQL databases.
In this guide, we will walk you through the most common issue we face while deleting a resource group after using the Recovery Services vault.
V. Governance & Compliance (Create Alerts + Log Analytics Workspace + Azure Policy + Tags)
Governing your own resources and how they are used is only part of the solution when using a cloud provider. You also have to understand how the provider manages the underlying resources you are building on. Azure Policy and Compliance Manager help you to do just that and keep your cloud environment compliant with the necessary norms.
In this Activity Guide, we will walk you through the steps to browse through the Azure Portal and do just that and also cover log analytics among other things.
VI: Generate SSH Keys
SSH keys come in many sizes, but a popular choice is RSA 2048-bit encryption, which is comparative to a 617 digit long password. On Windows systems, it is possible to generate your own SSH key pair by downloading and using an SSH client like PuTTY.
On Mac and Linux systems, it is possible to generate an SSH key pair using a terminal window.
In this guide, we will discuss how to generate SSH Keys and use it for connecting your Linux VM.
VII: Create Virtual Machine and Virtual Machine Scale Set
The most basic task that can be performed on any cloud platform is the creation of a Virtual Machine
Azure Virtual Machines (VM) is one of several types of on-demand, scalable computing resources that Azure offers. Typically, you choose a VM when you need more control over the computing environment than the other choices offer.
Virtual machine scale sets allow you to create and manage a group of identical, load-balanced VMs. where the number of VMs automatically increases and decreases based on demand.
This guide gives you information about what you should consider before you create a VM, how you create it, and how you manage it using Azure Portal, PowerShell, and CLI and also all the information you need to be able to keep your machines highly available, redundant, and scaled according to demand.

VIII: Create an Azure Bastion host
The Azure Bastion service is a new fully platform-managed PaaS service that you provision inside your virtual network. It provides secure and seamless RDP/SSH connectivity to your virtual machines directly in the Azure portal over TLS.
When you connect via Azure Bastion, your virtual machines do not need a public IP address.

IX: Attach Data Disk, Expand OS Disk Size, Resize VM, Enable Auto-shutdown, Add NIC and Reset Password
The OS disk and temporary ephemeral disk are provisioned by default for all Azure VM’s when they are created. However, data disks are optional, and you have the choice of creating and attaching one or more data disks (depending upon the VM type) to an Azure VM either during provisioning time or later.
You can change (only expand) the Azure VM OS disk size Manually from within the portal. You can quickly expand the OS disk size of any existing Azure VM, irrespective of the Installed OS (Windows Linux).
After you create a virtual machine (VM), you can scale the VM up or down by changing the VM size. In some cases, you must deallocate the VM first.
The Start/Stop VMs during off-hours feature start or stops enabled Azure VMs. It starts or stops machines on user-defined schedules, provides insights through Azure Monitor logs, and sends optional emails by using action groups.
A network interface enables an Azure Virtual Machine to communicate with the internet, Azure, and on-premises resources. When creating a virtual machine using the Azure portal, the portal creates one network interface with default settings for you or you can add it can afterwards also.
In this guide, we will provide you with information about How to attach a Data Disk and Expand OS Disk on an existing VM. Also, we will walk you through the steps to add or remove various extra functions in a VM.
X. Create an Azure Storage Account, Azure Storage Container, Upload Blob, and Assign File Storage To VM
An Azure storage account contains all of your Azure Storage data objects: blobs, files, queues, tables, and disks. The storage account provides a unique namespace for your Azure Storage data that is accessible from anywhere in the world over HTTP or HTTPS. Data in your Azure storage account is durable and highly available, secure, and massively scalable.
blobs consist of blocks of data assembled to make a blob. Most scenarios using Blob storage employ block blobs. Block blobs are ideal for storing text and binary data in the cloud, like files, images, and videos.
Azure Files offers fully managed file shares in the cloud that are accessible via the industry-standard Server Message Block (SMB) protocol. You can mount Azure file shares concurrently on cloud or on-premises deployments of Windows, Linux, and macOS.

XI: Network Access For Storage Accounts In Azure
To secure your storage account, you should first configure a rule to deny access to traffic from all networks (including internet traffic) on the public endpoint, by default. Then, you should configure rules that grant access to traffic from specific VNets. You can also configure rules to grant access to traffic from select public internet IP address ranges, enabling connections from specific internet or on-premises clients.

XII: Creating a Virtual Network, Extra Subnet
Azure Virtual Network (VNet) is the fundamental building block for your private network in Azure. VNet enables many types of Azure resources, such as Azure Virtual Machines (VM), to securely communicate with each other, the internet, and on-premises networks. VNet is similar to a traditional network that you’d operate in your own data center but brings with it additional benefits of Azure’s infrastructure such as scale, availability, and isolation.

A subnet, or subnetwork, is a segmented piece of a larger network. More specifically, subnets are a logical partition of an IP network into multiple, smaller network segments.
All Azure resources deployed into a virtual network are deployed into a subnet within a virtual network.
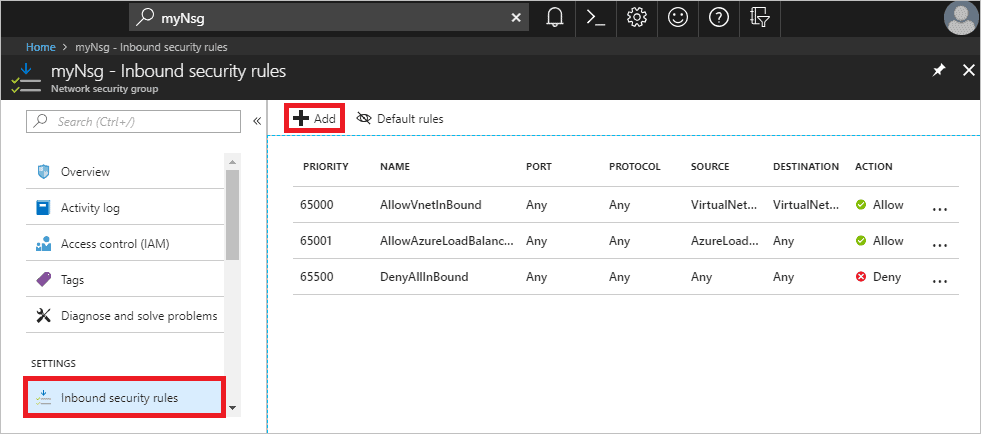
XIII: Network Security Group, Azure DNS Server
A network security group contains security rules that allow or deny inbound network traffic to, or outbound network traffic from, several types of Azure resources. For each rule, you can specify source and destination, port, and protocol.
In this Activity Guide, We will walk you through the steps to browse through the Azure Portal and how to make your virtual network more secure with the help of network security groups.
Azure Virtual Network is the fundamental building block for your private network in Azure. VNet enables many types of Azure resources to securely communicate with each other, the internet, and On-Premises networks. Also, you’ll learn to configure Azure DNS to resolve hostnames in your public domain.
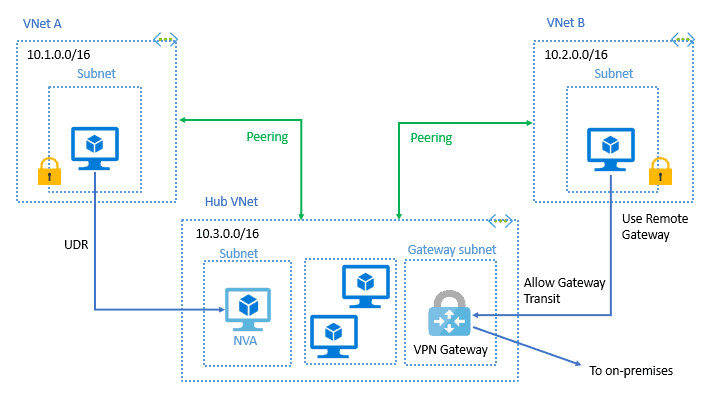
XIV. VNet Peering in Azure
You can connect virtual networks to each other with virtual network peering. These virtual networks can be in the same region or different regions (also known as Global VNet peering).
Once virtual networks have peered at, resources in both virtual networks are able to communicate with each other.
In this Activity Guide, we will walk you through the steps to browse through the Azure Portal and how to do VNet peering and also communicate between the two virtual networks.
XV: VPN Gateway Connection
A VPN gateway is a specific type of virtual network gateway that is used to send encrypted traffic between an Azure virtual network and an on-premises location over the public Internet. You can also use a VPN gateway to send encrypted traffic between Azure virtual networks over the Microsoft network.
In this Activity Guide, we will walk you through the steps to browse through the Azure Portal and how to do VNet peering using VPN gateways.

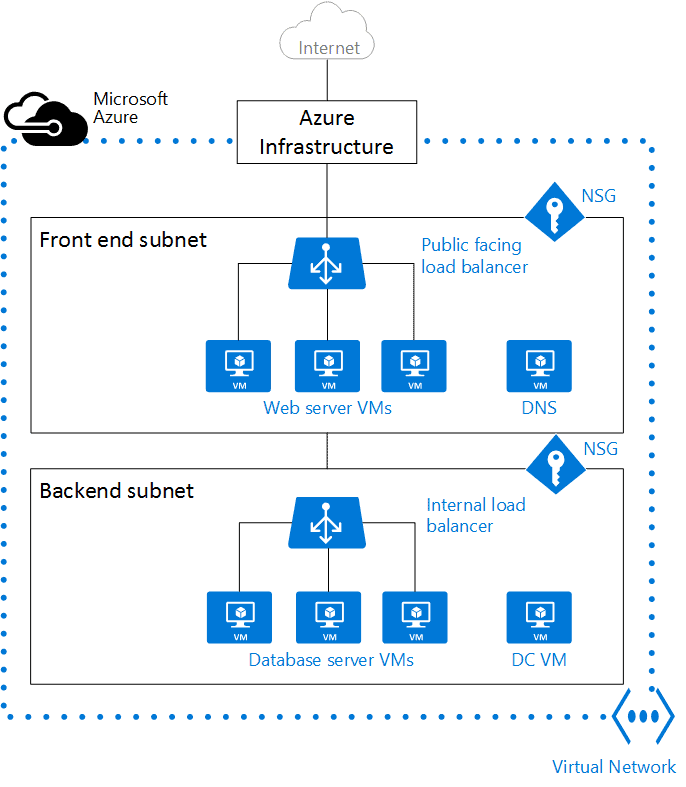
XVI. Load Balancers, Traffic Manager Monitoring, and Network Watcher
Load Balancer distributes inbound flows that arrive at the load balancer’s front end to backend pool instances. These flows are according to configured load balancing rules and health probes.
- A public load balancer can provide outbound connections for virtual machines (VMs) inside your virtual network.
- Internal load balancers are used to load balance traffic inside a virtual network.
Azure Traffic Manager includes built-in endpoint monitoring and automatic endpoint failover. This feature helps you deliver high-availability applications that are resilient to endpoint failure, including Azure region failures.
Network Watcher provides you with the ability to diagnose your most common VPN Gateway and Connections issues. Allowing you, not only, to identify the problem but also to use the detailed logs created to help further investigate. Monitor and diagnose networking issues without logging in to your virtual machines (VMs) using Network Watcher.
In this Activity Guide, we will walk you through the steps to browse through the Azure Portal and how to create load balancers for your virtual machines for both, internet connections and internal connections and how to configure manage traffic manager.
XVII: Role-Based Access Control In Azure, Custom RBAC Roles, and Microsoft Azure Directory Synchronisation
Access management for cloud resources is a critical function for any organization that is using the cloud. Azure role-based access control (Azure RBAC) helps you manage who has access to Azure resources, what they can do with those resources, and what areas they have access to.
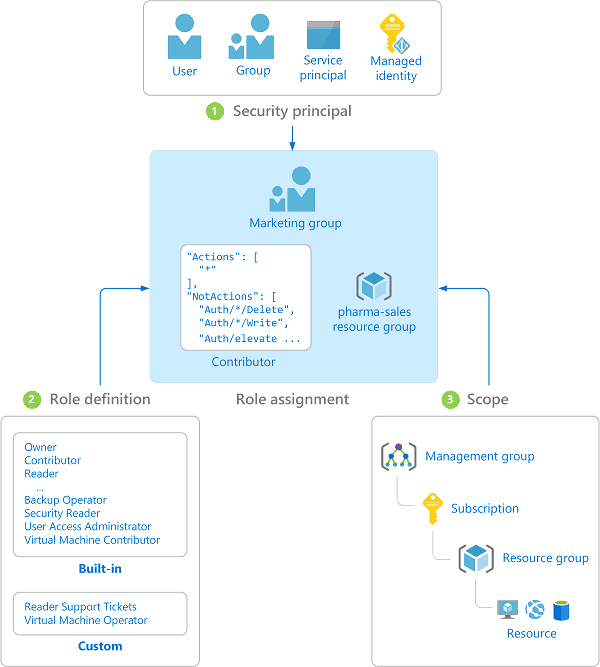
If the Azure built-in roles don’t meet the specific needs of your organization, you can create your own custom roles. Just like built-in roles, you can assign custom roles to users, groups, and service principals at the management group, subscription, and resource group scopes.
Custom roles can be shared between subscriptions that trust the same Azure AD directory. There is a limit of 5,000 custom roles per directory.
Azure Active Directory (also known as Azure AD) is a fully managed multi-tenant service from Microsoft that offers identity and access capabilities for applications running in Microsoft Azure
and for applications running in an on-premises environment. Azure AD is not a replacement for Windows Server Active Directory. If you already have an on-premises directory, it can be extended to the cloud using the directory integration capabilities of Azure AD. In these scenarios, users and groups in the on-premises directory are synced to Azure AD using a tool such as Azure Active Directory Sync (AAD Sync).
In this guide, we will provide you the information on how to Configure RBAC Roles, Create Custom RBAC Roles, and Sync your On-Prem AD with the Azure AD.
XVIII. Backup via MARS Agent
Azure Backup uses the MARS agent to back up files, folders, and system state from on-premises machines and Azure VMs. Those backups are stored in a Recovery Services vault in Azure.
- Directly on on-premises Windows machines.
- On Azure VMs that run Windows side by side with the Azure VM backup extension.
- On a Microsoft Azure Backup Server (MABS) instance or a System Center Data Protection Manager (DPM) server.

XIX: Azure Site Recovery (ASR)
Azure Site Recovery (ASR) service helps in strengthening your business continuity and disaster recovery (BCDR) strategy that keeps your data safe, and your apps and workloads online, when planned and unplanned outages occur.
- Site Recovery replicates workloads running on physical and virtual machines (VMs) from a primary site to a secondary location, hence creating automatic failovers.
- Backup service keeps your data safe and recoverable.
In this Activity Guide, we will walk you through the steps to browse through the Azure Portal and how to use the MARS agent to backup your own cloud data and Azure Site Recovery service to create your own robust cloud solutions.
Also read: Azure Availability Zones to understand Availability Sets, Fault domains, Update domains, and Availability Zone in a better way.
XX. Azure Kubernetes Cluster (AKS)
Modern applications are increasingly built using containers, which are microservices packaged with their dependencies and configurations. Kubernetes is open-source software for deploying and managing those containers at scale, Azure Kubernetes Cluster lets you do just that for the microservices you run on the Azure cloud.
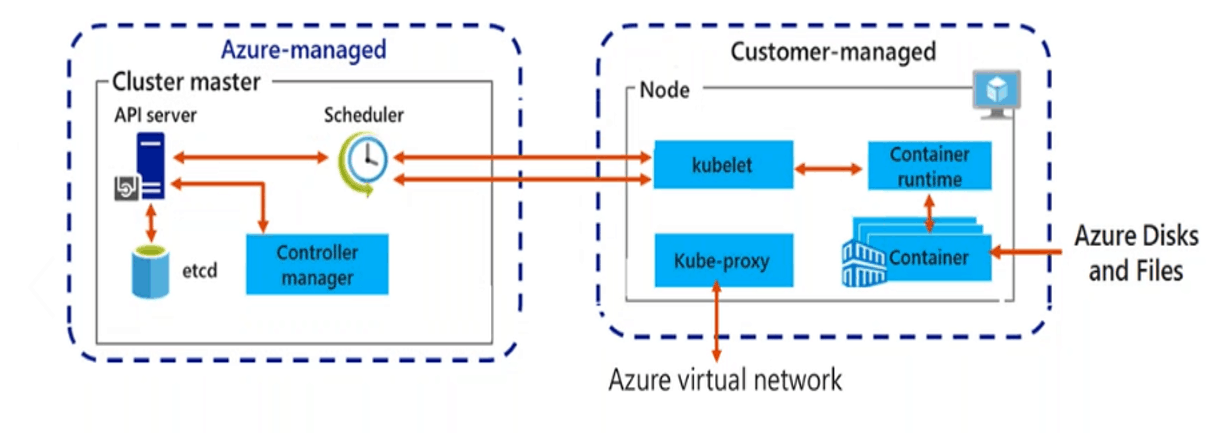
Check our blog for more information on Containers (Docker) & Kubernetes in Azure.
XXI: WebApps Creation With 2 Deployment Slots
here you deploy your web app, web app on Linux, mobile back end, or API app to Azure App Service, you can use a separate deployment slot instead of the default production slot when you’re running in the Standard, Premium, or Isolated App Service plan tier.
Deploying your application to a secondary slot has the following benefits:
- You can validate app changes in a staging secondary deployment slot before swapping it with the production slot.
- Deploying an app to a secondary slot first and swapping it into production makes sure that all instances of the slot are running smoothly
- After a swap, if the changes swapped into the production slot aren’t as you expect, you can reverse the swap immediately to get your “last known good site” back.
In this Activity Guide, we will walk you through the steps on how to setup AKS and manage your microservices without hassles on the cloud and how to set up a production slot as well as a secondary slot for your web app so that all updates and changes in production are done seamlessly.
Related/References
- [AZ-104] Microsoft Azure Administrator Certification Exam: Everything You Need To Know
- AZ-104 v/s AZ-103: Microsoft Azure Certification Exam
- Azure Cloud Administrator [AZ-104] Certification Q/A (Free Masterclass)
- To know about official Microsoft Azure Administration certification exam click here.
Next Task For You
Begin your journey towards becoming a Microsoft [AZ-104] Certified Azure Administrator by joining our FREE Masterclass. We strongly recommend gaining knowledge from AZ-104 in order to be an effective Azure Administrator. Our course covers the AZ-104 certification.
Click on the below image to register for the Free Masterclass NOW!
The post [AZ-104] Microsoft Azure Administrator Training: Step By Step Activity Guides/Hands-On Lab Exercise appeared first on Cloud Training Program.