
In order to do something useful with containers, they need to be organized as a part of a project, usually referred to as an application. There are multiple ways of orchestrating a Docker application, but Docker Compose is perhaps the most human-friendly. It is a tool for defining and running multi-container Docker applications. It allows users to launch, execute, communicate and shut containers with one coordinated command.
It makes it easier for users to orchestrate the processes of Docker containers, including starting up, shutting down, and setting up intra-container linking and volumes.
In this blog, I’ve covered
- What is Docker Compose
- Why Docker Compose
- Features
- Common use cases
- Install Docker Compose
- Containerise Application using Docker Compose
- Docker-compose file
- Dockerfile vs docker compose
- Compose V2 and the new compose command
What is Docker Compose? ^
Compose is a tool for defining and running multi-container Docker applications. With Compose, you utilize a YAML file to configure your application’s services. Then, with one command, you create and begin all the services from your configuration. Compose works in all environments: production, staging, development, testing, as well as CI workflows.
Read This blog in which we provide you with an overview of Helm and Helm Charts description and why is it beneficial. If you are new to Kubernetes, it will be helpful to read Kubernetes Introduction and Its architecture first to familiarize yourself with the basics concept.
Using Compose is basically a three-step process:
- Define your app’s environment with a Dockerfile so it can be reproduced anywhere.
- Define the services that make up your app in docker-compose.yml so they can be run together in an isolated environment.
- Run docker-compose up and Compose starts and runs your entire app.
Also read: Docker vs Virtual Machine to understand what is their difference.
Why Docker Compose? ^
Docker has made it easier to set up a local development environment. However, if you want to create more than one container for your application, you have to create several Docker files. This adds to a load of maintaining them and is also quite time-consuming.
It solves this problem by allowing you to use a YAML file to operate multi-container applications at once. You can set the desired amount of containers counts, their builds, and storage designs, and then with a single set of commands, you can build, run, and configure all the containers.
Also check: Our blog on Install Kubernetes
Features ^
The features of Compose that make it effective are:
- Multiple isolated environments on one host.
- Preserve volume data once containers are created.
- Only recreate containers that have modified.
- Variables and moving a composition between the environment.
Check out: Docker & Certified Kubernetes Administrator (CKA). A Kubernetes certification makes your resume look good and stand out from the competition. As companies rely more and more on Kubernetes, your expertise will be an immediate asset.
Common use cases ^
Compose can be used in many different ways. Some common use cases are outlined below.
Development environments
When you’re developing software, the ability to run an application in an isolated environment and interact with it’s crucial. The Compose command-line tool can be used to create the environment and interact with it.
Automated testing environments
An important part of any Continuous Deployment or Continuous Integration method is the automated test suite. Automated end-to-end testing requires an environment in which to run tests. Compose provides a convenient way to create and destroy isolated testing environments for your test suite.
Compose file, you can create and destroy these environments in just a few commands:
$ docker compose up -d
$ ./run_tests
$ docker compose down
Also Check: Our previous blog post on Docker Image Vulnerability. Click here
Install Docker Compose ^
Compose is now part of the Docker CLI it can be installed via a convenience script with Docker Engine and the CLI. You can install compose as a plugin with the docker CLI or separately as we are doing here.
Step 1: Update
sudo apt-get update
Step 2: Install Docker Compose Plugin.
sudo apt-get install docker-compose-plugin
Also Read: Our blog post on Docker Tutorial. Click here
Step 3: Check the Version
To verify the installation, check the Docker Compose version by running:
docker compose version
If the output shows the release downloaded in Step 3, you have successfully installed the package.
Also see: This blog covers the important part of Kubernetes which is Kubernetes Network Policy
Containerize Application using Docker Compose ^
Convert an application deployment into a stack using a file named docker-compose.yml
Step 1: Start with installing docker compose
$ sudo apt-get update -y
$ sudo apt-get install docker-compose-plugin
Step 2: Create a directory for the project
$ mkdir stackdemo
$ cd stackdemo
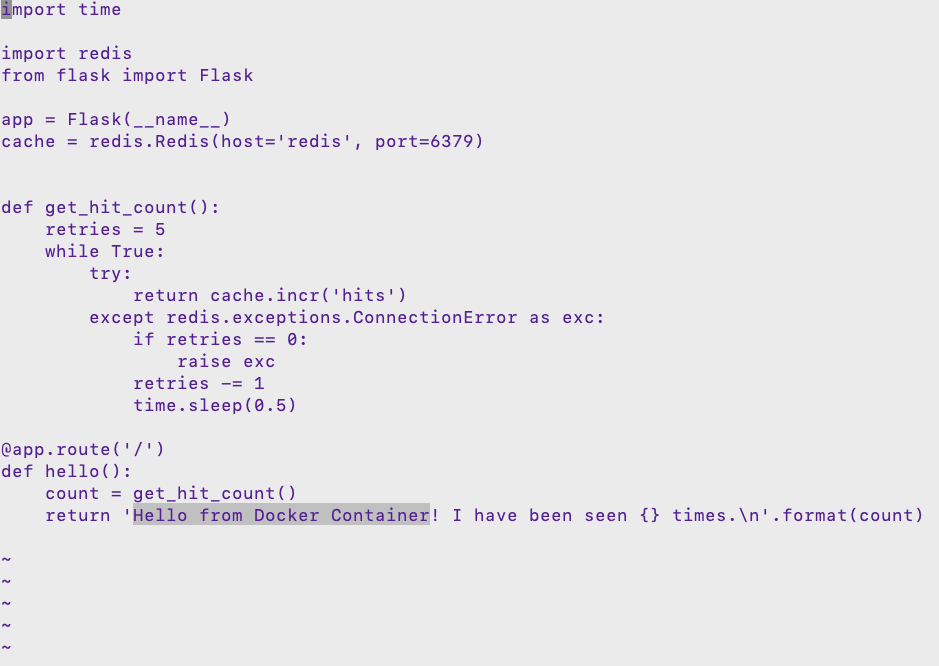
Step 3: Create a file called app.py in the project directory and the below code
$ vim app.py
Then, add the following code in it:
import time
import redis
from flask import Flask
app = Flask(__name__)
cache = redis.Redis(host='redis', port=6379)
def get_hit_count():
 retries = 5
 while True:
 try:

support@k21academy.com 40
 return cache.incr('hits')
 except redis.exceptions.ConnectionError as exc:
 if retries == 0:
 raise exc
 retries -= 1
 time.sleep(0.5)
@app.route('/')
def hello():
 count = get_hit_count()
 return 'Hello World! I have been seen {} times.\n'.format(count)
Step 4: Create a file called requirements.txt
Add the following text in it:
flask
redis
 Step 5: Create a file called Dockerfile
$ vim Dockerfile
Add the following code in it:
FROM python:3.7-alpine
WORKDIR /code
ENV FLASK_APP app.py
ENV FLASK_RUN_HOST 0.0.0.0
RUN apk add --no-cache gcc musl-dev linux-headers
COPY requirements.txt requirements.txt
RUN pip install -r requirements.txt
COPY . .
CMD ["flask", "run"]
Note: when you copy this file from here Please retype the [“ ”] again manually otherwise in later steps you will get the error. When you copy this from here the double quotes need to type again in the file.
Step 6: Create a file named docker-compose.yml
$ vim docker-compose.yml
Add the following code in it:
version: '3'
services:
web:
build: .
ports:
- "5000:5000"
redis:
image: "redis:alpine"
Step 7: Build and run the application
$ docker compose up -d
Step 8: Verify the application running
Enter http://hostip:5000/ in a browser to see the application running
 Step 9: List the application running as part of the stack using compose commands.
$ docker compose ps

$ docker ps
 Step 10: Edit the Compose file to add a bind mount
Edit docker-compose.yml in to add a bind mount for the web service:
Note: Know more about Docker Storage
Step 11: Re-build and run the app with Compose
$ docker compose up

Step12: Update the application without having to re-build it
Because the application code is now mounted into the container using a volume, we can make changes to its code and see the changes instantly, without having to rebuild the image.
Open a new terminal and change the greeting in app.py and save it. For example, change the Hello World! message to Hello from Docker Container!:
 Step13: Verify the application running is updated on the fly
Enter http://hostip:5000/ in a browser to see the application running
 Step 14: Bring the application down
$ docker compose down

Also Read: Kubernetes Labels and Kubernetes Annotations are one of the main components which provide a way for adding additional metadata to our Kubernetes Objects.
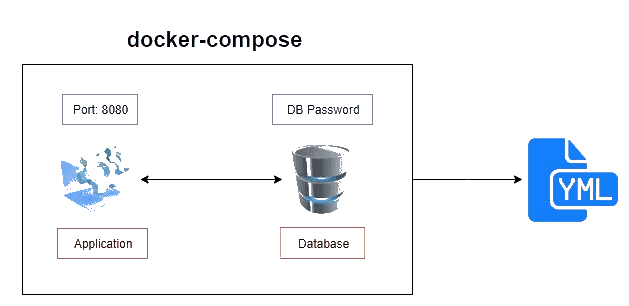
Docker Compose.yml file ^
To configure the orchestration, Compose uses a docker-compose.yml file. It specifies what images are required, what ports they need to expose, whether or not they have access to the host filesystem, what commands should be run when they start up, and so on. A docker-compose.yml file which uses Dockerfile, but also adds a database to the stack. This docker-compose.yml file looks like:
version: '3'
services:
  web:
    build: .
    ports:
     - "8080:80"
  db:
    image: mysql
    ports:
    - "3306:3306"
    environment:
    - MYSQL_ROOT_PASSWORD=password
    - MYSQL_USER=user
    - MYSQL_PASSWORD=password
    - MYSQL_DATABASE=demodb
With docker-compose.yml file, you’ll write once and use it often. So craft a Dockerfile for an element of the stack and re-use it for multiple stacks, by way of docker-compose.yml. Remember, docker-compose.yml files are used for defining and running multi-container Docker applications, whereas Dockerfiles are simple text files that contain the commands to assemble an image which will be used to deploy containers.
So the workflow looks like this:
- Create Dockerfiles to build images.
- Define complex stacks (comprising of individual containers) based on those Dockerfile images from within docker-compose.yml.
- Deploy the entire stack with the docker-compose command.
Read about: Monolithic vs Microservices – Difference, Advantages & Disadvantages
Dockerfile vs Docker Compose ^
A Dockerfile is a text document that contains all the commands/Instructions a user could call on the command line to assemble an image. Using docker build command we can build an image from a Dockerfile.
Docker Compose is a tool for defining and running multi-container Docker applications. With Compose, you use a YAML file to configure your application’s services. Then, with a single command, you create and start all the services from your configuration. By default, it expects the name of the Compose file as docker-compose.yml or docker-compose.yaml. If the compose file has a different name we can specify it with -f flag.
Compose V2 and the new compose command
The new Compose V2, which supports the compose command as part of the Docker CLI, is now available.
Compose V2 integrates compose functions into the Docker platform, continuing to support most of the previous docker-compose features and flags. You can run Compose V2 by replacing the hyphen (-) with a space, using docker compose, instead of docker-compose.
Related/References
- Visit our YouTube channel on “Docker & Kubernetes”
- Docker Architecture, Docker Engine Components, Container Lifecycle
- Docker Images: A Complete Guide For Beginners
- Docker Networking | Introduction to Docker Network
- Kubernetes vs Docker – Understand the Difference
- Certified Kubernetes Administrator (CKA) Certification Exam
- Create AKS Cluster: A Complete Step-by-Step Guide
- Container (Docker) vs Virtual Machines (VM): What Is The Difference?
- How To Setup A Three Node Kubernetes Cluster For CKA: Step By Step
Join FREE Masterclass
To know about what is the Roles and Responsibilities of Kubernetes administrator, why you should learn Docker and Kubernetes, Job opportunities for Kubernetes administrator in the market, and what to study Including Hands-On labs you must perform to clear Certified Kubernetes Administrator (CKA) certification exam by registering for our FREE Masterclass.
The post Docker Compose Overview & Steps to Install Docker Compose appeared first on Cloud Training Program.