
iIn this blog, we are going to cover the Azure Function App, the Features of the Azure Function, and Creating the Azure Function App.
Topics we’ll cover:
1. Azure Functions
2. Uses Of Azure Functions
3. Implementing Azure Function
Azure Functions App
Azure Functions App is the serverless computing service hosted on the Microsoft Azure public cloud. Azure Functions App, and serverless computing, in general, are designed to accelerate and simplify application development.
Traditional application development demands a consideration of the underlying IT infrastructure. For cloud computing, an IT team must create, monitor, and pay for cloud computing instances — regardless of how much work that instance actually does for the business.
The idea behind serverless computing, also known as function as a service, is to eliminate those infrastructure considerations for the user. With serverless, a user can simply create and upload code, and then define the triggers or events that will execute the code. Triggers can come from a wide range of sources, including another user’s application or other cloud services, such as databases and event and notification hubs.
Once a trigger or event occurs, it is the cloud provider’s responsibility to load the code into a suitable execution environment, run the code and then release the compute resources. There are still servers involved, but the user no longer needs to provision or manage compute instances. In addition, rather than pay for those compute instances and other associated resources each month, users pay for serverless computing based on the amount of time a function runs in a given billing cycle. 
Features Of Azure Functions App
1. Multiple Language Support: Azure Functions support many languages. You can write the functions in different languages of your choice like C#, Python, Java,Javascript,PHP,Node.js, etc.
2. Serverless applications support: With serverless, we can simply create and upload the code for the application, and then we just need to define the triggers or events that will execute the function. It reduces the developer’s time and the unnecessary headache to worry about the infrastructure as a developer.
3. Pay as you use pricing model: Azure functions provide the pay as you use a pricing model that helps to save a lot of costs. You just need to pay for the time the code is run.
4. Easy integration with Azure services and other 3rd-party services: Another cool feature of Azure Function is, You can easily integrate the Azure Function with different Azure services and Along with that, you can also easily integrate with different 3rd-party services like Azure DevOps services, Github, Azure CosmosDB, Azure Event Grid, etc.
5. Continuous Deployment and Integration support: Azure Function supports Continuous deployment and integration because Developers still need them along with GitHub, Microsoft Visual Studio Team Services, Eclipse, etc.
Implementing Azure Functions App
1. In the Azure portal, click on Create a resource. (Please make sure you have a subscription before doing all this. If you created a free account for the first time, you’ll already have a FREE TRIAL subscription for 1 month).
2. Now, click on the Azure Function App option to create one.

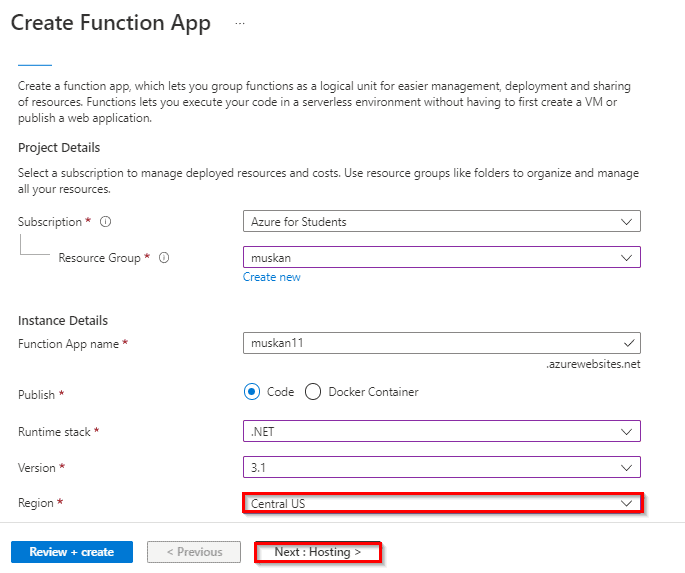
3. Now, fill in all the details such as resource group, name of the function app, publishing option, runtime stack which is the language, version of the runtime stack, and the region to deploy the app. Then click on Next: hosting.


4. Then click on Next: Monitoring if you don’t want to make any changes in the service plan. Then click on Review + create.

5. Now, click on Create.

6. Now, click on Go to the resource. Then click on the Functions option in the Overview of your Functions App.

7. Then click on the Add option present there. After that, a window will open on the right, and select the HTTP trigger option present there.


8. Then in the new window give a new name to your function if you want and then change the authorization level to anonymous for this demo.

 9. Then click on Create Function. After that, a new HTTP trigger will be created. Select the option of Get File URL and then click on the copy to clipboard button to copy the URL.


10. Then paste the URL that you copied in a new tab and pass a parameter in that by adding “name=Your_Name” at the end of the URL as shown below. Then hit Enter. You’ll be treated with a message saying that the HTTP trigger function is executed successfully.

11. Now, if you go back to the previous tab where your HTTP trigger function was created and click on Code+Test and then Logs. Then, there you’ll be able to see that your trigger function executed successfully.

Conclusion
We are able to Started a PowerShell session in Azure Cloud Shell. Created a resource group and an Azure-managed disk by using Azure PowerShell. Configured the managed disk by using Azure PowerShell
Related Reference
- [AZ-104] Microsoft Azure Administrator Training: Step By Step Activity Guides/Hands-On Lab Exercise
- Azure Storage Accounts Overview & Steps To Create
- Azure File Share & Azure File Sync
- Azure Blob Storage: Features, Usage, And Steps to Create
Next Task For You
Begin your journey toward becoming a Microsoft Azure Administrator [AZ-104] by joining our FREE Class. We strongly recommend gaining knowledge from AZ-104 in order to be an effective Azure Administrator. Our course covers the AZ 104 certification. Click on the below image to register for the Free Class NOW!

The post Introduction To Azure Functions App| Features| Implementing Azure Function App appeared first on Cloud Training Program.